Modern acoustic systems, as a rule, provide stereo sound, that is, two sound sources and if the flows are distributed correctly, you get the feeling that you are directly in the concert hall. Achieving a similar effect at home is very possible, but to do this you need to make speaker stands with your own hands. Don’t be afraid that you are not a master and you have nothing at home except a hammer and pliers. Although here, of course, you will need a little more tools, the whole process is not as complicated as it might seem at first glance.
Vibration protection
The components of the speaker system need not just to be placed on shelves, but to be protected from vibrations. Record players are most sensitive to their influence. All lamp elements are also subject to vibration. Digital and other transistor technology are more resistant to vibration, but vibration can come from disk drives or power transformers. Therefore, racks for acoustic equipment must have the most effective vibration isolation.
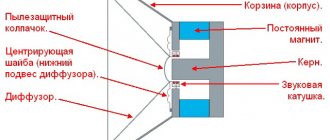
Vibrations have an even stronger effect on speakers, especially those installed on shelves. To improve sound quality, floor-standing speakers have a tweeter or mid/high frequency unit, which is made in a separate housing and is mechanically decoupled from the main unit. A similar effect is achieved when installing compact bookshelf speakers on high-quality inert speaker stands. When installing speakers on an unstable shelf, every millimeter of displacement leads to micro-oscillations through the woofers and significant distortion at the HF.
Combination stand
The simplest and fastest equipment rack to assemble is made from chipboard sheets cut to size, preferably laminated, pipes of the same length and round flanges. You will also need several meters of edges, an iron, 3x16 screws, and a screwdriver. In chipboard cutting workshops, you give the required dimensions to the craftsman, and he makes neat cuts on a professional machine. You can also order edge gluing there, but the cost will be much more expensive. If you want to save money, you can very quickly stick it on yourself at home using a simple hot iron.
After the chipboard sheets are delivered home, the assembly of the rack begins. First, the places for screwing the flanges are carefully marked so that the stand is symmetrical. When everything is marked, we get to work. Flanges are mounted on screws, 6 pieces on each shelf. On the two middle shelves this is done on both sides. 4 furniture wheels are screwed to the bottom of the lower shelf. Then the tubes are inserted, the next shelf is put on top, etc.
Requirements for equipment racks
Regardless of whether you decide to buy or make a stand for audio equipment with your own hands, it should:
- Promote high sound quality – create favorable acoustic conditions for sound transmission. A vibration-isolated stand improves dynamics by 10–20%, creates tighter and more powerful bass, makes the sound richer and more voluminous, and provides clarity and depth.
- Provide vibration isolation and damping - cut off all resonances or manage vibrations, control them, intelligently respond to vibrations, differentially absorb or reflect them.
- Provide convenient access to all system components.
- Ensure reliable installation and safe use of equipment - withstand heavy weight loads and do not interfere with natural ventilation and cooling.
- Harmoniously complement the system and fit into the interior.
- Use the occupied space rationally.
The equipment rack is not capable of eliminating electronic defects, but it is not required to do so. Its task is to perform the listed functions and contribute to the maximum disclosure of the equipment’s capabilities. Thanks to such stands, clear sound is achieved, creating conditions for watching films and listening to music in the same high quality as in a cinema.
↑ Ah! These legs, butts, shelves...
Next, I was followed by the choice of shelf material, type of lintels and, of course, legs.
With the legs, everything immediately became clear - they would be wheels. Because My components are heavy, and my mother’s laziness dictates that I shouldn’t unplug and remove all the equipment every time if I decide to vacuum under and behind the counter. Looking ahead, I’ll say that I didn’t miss a beat, with wheels instead of legs everything turned out great. But what should we do with the material of the shelves? I rejected the glass immediately due to my own taste preferences. Aimed at a tree. But which one? Or go the generous route and go crazy by ordering sanded MDF and veneering it or limit yourself to laminated chipboard with trim? Unwittingly remembering my difficult experience of veneering two small shelves, I quickly dismissed the crazy thought of veneering. Therefore, my only option was to order laminated chipboard with edge trim. Which is what I did. I wandered into the office that deals with cutting, edging and everything else related to chipboard, thrust a piece of paper with a simple drawing under the manager’s nose, and chose the material (16 mm suited me completely, “Zebrano” pattern). I paid, received a receipt in response and stomped home.
Choice of materials and design
For high-quality music reproduction, every detail is important - from the selected materials, their combination and design features of the stand to the coating applied to the surface of the shelves with anti-resonance properties. All these factors affect the sound of an audio system and the listeners' perception of sound. Each material resonates differently, for example, the sound of an acoustic guitar depends even on the type of wood from which the body is made.
The equipment rack is similar in purpose to the body of a guitar or other musical instrument. It plays the role of a kind of filter, which in a certain way reflects and absorbs various frequencies from vibrations occurring in the system components. Professional equipment racks are developed using the latest achievements of science and technology. For example:
- to create an effective system of decoupling from the floor and components, developers combine materials in different ways, calculate their relative position, mass and density, and look for optimal shapes;
- supports and frames are made of steel and aluminum, shelves are made of honeycomb materials and multi-layer sandwich;
- Black lead powder and special graded cast iron can be used as a filler.
Double stand
In order to make this set of two units, you need to have softwood boards, wooden beams, stain, varnish, metal legs and wood screws, sandpaper, D3 wood glue, and clamps. First you need to draw a drawing of the future structure. Since the TV is placed on a rectangular shelf, its length should extend a few centimeters beyond the edges of the screen on each side. Boards are cut to the required length for two rectangular shelves and three square ones. Then the side strips are coated with carpenter's glue and tightened with clamps until completely hardened. At temperatures above 8 degrees, the glue dries in about 40 minutes. If the temperature is lower, the glue will not work; this cannot be done. It is best to seal and leave the workpiece overnight.
The finished panels are thoroughly sanded with sandpaper No. 80, then No. 120, and finally No. 180. Everything is covered with stain. Choose the color as you wish. Then it is covered with a layer of soil. After drying, rub again with sandpaper No. 180, as the pile will rise from the soil. The last step will be varnishing.
Next we prepare square wooden beams. Under the upper shelves, an angle is cut out with the letter G, half a tree, under the middle and lower shelves - with the letter P, also half a tree. After fitting the shelves onto the legs and drilling holes for fastening with screws, we repeat the painting procedure for the legs. After assembling the shelves, turn them upside down and screw on the metal legs. The wooden equipment rack is ready.
Creating a rack for Hi-Fi equipment with your own hands
If you wish, you can make a rack for equipment with your own hands according to drawings developed independently or taken from the Internet. And although homemade furniture is significantly inferior to its professional counterparts in its ability to control vibrations, it will cope with basic tasks. The main thing is to think through the design of the audio stand, calculate the number of shelves and the optimal distance between them.
General recommendations
The home theater TV should be at eye level. To conveniently place a player, loudspeaker, receiver and other equipment, additional shelves are needed. The overall aesthetics of the installed equipment is enhanced by the presence of a hidden cable channel.
Each shelf or cabinet as a whole must have vibration decoupling from the floor in the form of conical spikes or silicone supports, which reduce the effect of parasitic vibrations on sensitive equipment. Some models use hollow supports into which sand, shot or other high-density materials are poured to weigh down the structure.
Make or buy?
DIY designs are appropriate if you view an audio rack as a comfortable piece of furniture that doesn't require superpowers to control vibrations. But if the equipment you are using is very sensitive to vibrations (for example, a vinyl player), it is better not to experiment and immediately buy a stand that provides effective vibration isolation and dampens all kinds of vibrations.
Materials for creating a rack for Hi-Fi or Hi-End equipment
To make a simple stand for audio equipment you will need:
- shelves made of chipboard or other material;
- 2 chrome-plated table legs – 1 m long, 25 mm in diameter;
- 2 steel rods with thread – 1 m long, 8 mm in diameter;
- nuts, washers;
- furniture legs;
- chrome caps - to hide the nuts on the top shelf.
Assembly sequence
First you need to take a hacksaw and cut the chrome legs into pieces, the length of which corresponds to the distance between the shelves. Then you can mark and drill holes for the rods in the corners of the shelves. To securely fasten the legs, make 1–2 mm round recesses using a 25 mm crown. Make indentations on one side on the top and bottom shelves, and on both sides on the middle shelf.
In the bottom shelf you need to drill blind holes to install the legs, and on the top shelf you need to widen the rod hole for the nut to a depth of 5–7 mm. This will allow the nut to sink into the material.
It is more convenient to perform assembly from the top shelf:
- fix the shelves on the rods using washers and nuts;
- put chrome tubes on the rods;
- install legs.
The price of such a stand is low, and it can be made in a few hours.
What is needed for this
When I encountered a similar problem, I first began to develop various designs for stands and puzzle over the materials. It seemed to me then that this was a problem with an asterisk, but then I realized that all the right things (no, not brilliant ones) can be done simply if you put in a little effort and a little ingenuity. So I went to the store and purchased the items necessary for such constructions.
Materials and tools
Source youtube.com
In the store I had to purchase the following things:
- chrome pipes – 6 pcs.;
- pipe holders – 12 pcs.;
- white self-tapping screws for holders;
- edge tape;
- laminated chipboard panels – 4 pcs.
It is not necessary to buy panels if you have laminated chipboard or OSB at home - you can cut them yourself. When I was choosing this simple kit in the store, they offered me ready-made panels measuring 400x200 mm, that is, they could be cut in half and get squares 200x200 mm. At first I also wanted to take them, but then I remembered that I had seen half a sheet of laminated OSB 20 mm thick in a friend’s garage and decided to contact him.
Source izi.ua
The thing is that I have a Radiotekhnika S30 system, which I bought back in the late 90s, but they “bomb” the apartment so much that I don’t need any others. So, the area of these speakers is 214x195 mm, which does not quite fit into the 200x200 mm stand - the edges will hang down. Actually, this is not critical, but still, I decided to refuse, since there was someone to turn to.
More about the tools you will need:
- hand-held circular saw or jigsaw;
- electric or cordless drill;
- hexagon:
- fitter's square;
- iron;
- tape measure, marker.
Note: I specifically wrote you a complete list of tools, although all of them may not be needed.
Let's start assembling
Source youtube.com
I don’t know whether you will prefer ready-made laminated chipboard tiles or decide to cut them yourself, so (just in case) I will give a little instruction. The clearest and most even cut is obtained with either a miter saw or a hand-held circular saw, since with the same jigsaw the line can “sag” slightly - this is a human factor. However, when marking, use a bench square (if you don’t have one, buy one - it’s a cheap thing, but very useful). Measure your speakers at the top, since at the bottom there are always four rubber bumps in the form of anti-slip feet, and they can prevent you from taking the exact size.
After you cut the chipboard to the size of your acoustics, divide each square into triangles to most accurately screw the holders. Take this seriously, since on the lower and upper tiles (support-stand) the holes for the pipes must match as accurately as possible. Of course, if there are millimeter deviations, you won’t even notice it, but large errors can lead to instability.
Source youtube.com
After you have screwed all the holders, you can proceed to gluing the edge tape or furniture edge (whatever you like, call it that). Immediately make cuts for each side of the stands (16 pieces), but at the same time leave a centimeter of reserve - after fixing, you will immediately cut them. Heat the iron (preferably on setting 2) and put on a glove or even two on your left hand to avoid getting burned (if you are right-handed). Carefully straighten the tape, turning its sticky side towards the surface to be treated, and run the iron over it with firm pressure. Now, immediately, without lifting the iron from the edge, move it in the opposite direction, but at the same time press the tape with your gloved hand. That's it, now you can carefully trim off the excess edges.
Source youtube.com
When everything is ready, you can glue some rubber squares (can be cut from an old bicycle tube) onto the lower support tiles for an anti-slip effect. Insert the pipes into the holes of the holders and secure them with special clamps provided there by the manufacturer. Each holder has one hexagon hole on the side - this is the clamp you need.
Source youtube.com
When you insert three pipes into the support, then immediately proceed to attaching the upper stand - this is much more convenient.
Source youtube.com
Now you can install your speakers and enjoy the music.
↑ Joker tubular
While the wood was being cut, I was thinking about the lintels. After going through a bunch of materials, I settled on the simplest, and, as it seemed to me, very nice. These are chrome-plated steel pipes of the Joker system for commercial equipment. Firstly, there are tons of them everywhere. Secondly, to attach them you do not need to have cabinetmaking skills, but rather a screwdriver or drill with a 2.5 drill and a Phillips screwdriver is enough.
The pipe is sold by the meter; some companies can immediately beautifully cut it to size using a pipe cutter.
Standard flange for mounting.
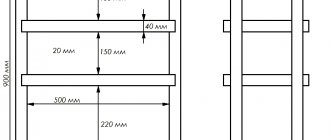
24 of these were needed. When choosing the distance between the shelves, I was guided by the equipment I had, and also, looking into the future, I figured out what else I would like, and I ended up with 3 shelves 20 cm high and one 15 cm high.
↑ Total
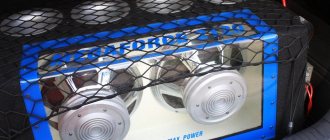
The stand is assembled within 40 minutes, 2 smoke breaks and 2 cups of coffee (tea, beer, cognac). You can see the result in the photo:
In general, I am three times pleased: I got an interesting experience, a beautiful, reliable stand of English design and not at all at the English price! :bye: Thanks for your attention!