Any sound reproduction system consists of an electronic and mechanical part. The electronic part is the amplifier, and the mechanical part is the loudspeakers, which are the basis of the speaker system. They often fail, so do-it-yourself speaker repair
will save the owner of the acoustics from serious expenses.
High-quality systems are expensive, and it is not always possible to repair them in specialized workshops. To figure out how to restore a speaker with your own hands,
you need to know its design.
Car Speaker Repair
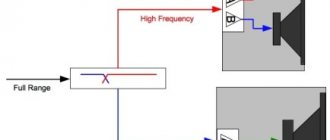
Car sound systems consist of two or three-way coaxial-type systems and a subwoofer. The coaxial device has an oval or round shape. Its design feature is the installation of a high-frequency head or “tweeter” on a special plate above the broadband acoustics diffuser. The system takes up little space, and the high-frequency head does not interfere with the propagation of sound waves. Car acoustics are subject to many negative influences. The presence of dust and constant vibration are the cause of failure of automotive audio systems.
Some models of coaxial car speakers consist of three speakers. Two of which - high-frequency and mid-frequency - are installed above the woofer. Most often, a malfunction occurs in the broadband head. Restore the speakers in the car
Can. This will require a simple tool and some skills. When repairing oval speakers with your own hands, you first need to remove the high-frequency unit.
To do this, you need to unscrew the central screw located on the rear flange of the speaker.
The screw head is usually sealed.
You need to remove the label, then the screw head will be accessible.
After the module is removed, you need to carefully unsolder the wires that go to it. Now you can work on the broadband head. The rubber suspension of the diffuser is pressed against a plastic pad. It needs to be pryed off with a flat screwdriver or a knife blade and removed from the diffuser holder. Then separate the rubber diffuser suspension. It is glued with elastic rubber-type glue, so you can pick up the edge with a screwdriver and then carefully peel it off with your hands. When the edge of the diffuser is completely separated from the metal base, the centering washer is removed. First, the voice coil wires should be unsoldered from the contact plate. Then very carefully peel off the centering washer. It is very easy to damage, so it is better to do the job with a flat and thin screwdriver.
When the speaker is completely disassembled, you can start looking for the defect. A malfunction of the acoustic system is determined by ear during operation. The sound in the speaker becomes distorted, wheezing and crackling appear, especially at high volume levels. Sometimes high frequencies disappear completely, and the sound becomes dull and unintelligible. Mostly do-it -yourself auto speaker repair
comes down to cleaning the magnetic gap of the broadband head from foreign inclusions. Most often, dirt or dust gets into the gap of the permanent magnet.
You can use a vacuum cleaner to remove debris. It is more difficult to remove metal particles from the gap. The speaker magnet is strong and a vacuum cleaner will not help here. When removing magnetic particles, regular tape will help. Small strips of it are inserted into the gap using a thin plate of textolite or other non-magnetic material. Then they are removed along with the adhered particles.
This operation should be repeated several times. You can see the quality of work using a powerful lamp and magnifying glass. The assembly is assembled in the reverse order. It is better not to remove the old glue, as this will allow the diffuser to be installed accurately. All gluing can be done with regular Moment glue. After installing the diffuser, you need to check by hand how well the voice coil moves in the magnet gap. There should be no mechanical interference. The coil should move without effort or rustling. Car speaker restoration and repair
does not require special knowledge, so
anyone can repair speakers with their own hands
Repair and modification of dynamic heads
The article describes methods for eliminating various malfunctions of loudspeaker heads, as well as some of their modifications in order to increase the durability and quality of sound reproduction associated with replacing the materials of the moving system.
I have been repairing speaker drivers for over ten years now. Due to the fact that the suspensions of both domestic and imported heads become unusable (polyurethane foam crumbles, butyl and fabric suspensions dry out and become rigid), I myself learned how to make woven suspensions impregnated using a unique technology, superior to the originals in a number of properties (frost resistance, durability , solvent resistance). I managed to obtain an impregnation that meets these requirements after two years of research work; some of its results are presented on the Internet [1].
In addition to replacing the suspensions, many are interested in the technology for eliminating other head malfunctions: displacements in the magnetic system (MS), broken supply wires or coils, defects in the centering washer, ruptured diffusers, and dented dust caps. This article describes methods for eliminating the listed faults, as well as some methods for improving the sound of speakers.
Magnetic head system
1. Centering the core.
As a result of an accidental impact or falling of the head, the adhesive connection of the MS parts may be broken, as a result of which the core moves in the gap and presses the diffuser coil against the washer. For repairs, it is necessary to fix the head on the board or in the same housing using a magnetic system in the middle (or out). First you need to insert thin and wide knives on both sides between the magnet and the washer and use a screwdriver to separate the magnet from the metal washer (it is better to do this together). After separating the displaced magnet, the MS should be re-glued only after the moving system has been peeled off and removed, in order to avoid deformation of the coil. For proper assembly, it is necessary to machine a centering sleeve for the core, preferably from a non-magnetic metal or hard plastic (caprolon, fluoroplastic, vinyl plastic), long enough for comfortable grip, since pulling out will have to take considerable effort. The outer diameter of the bushing is equal to the diameter of the hole in the washer, and the inner diameter is equal to the diameter of the core. After this, having removed the old glue and debris from the core and magnet, put the sleeve on the core and assemble the MS. For gluing, you can use epoxy resin and BF adhesives. "Moment" or others suitable for metals. Instead of a sleeve, you can use liners made of Mylar film, wrapping them around the core.
2. Cleaning the magnetic gap.
In car heads, the gap often becomes clogged with dirt, which causes them to fail. To repair, you need to peel off the diffuser, soak the MC in water for some time and then rinse the gap under a strong stream of water. Metal particles stuck to the edges of the gap can be removed with a long sewing needle (they stick to its tip) or a strip of metal from a beer can with the edge bent inward.
3. Disassembling the magnetic system.
The adhesive connection of MS parts is softened with acetone; It is better to do this by placing it in a plastic bag and pouring solvent into it. To prevent evaporation, the bag must be tied around the MS.
Many MC heads are glued with an epoxy composition, which softens at 150...200 °C. Therefore, the puck of such an MS can be heated with an iron set to maximum temperature, or the MS can be placed on a hot frying pan.
Lead wires
A malfunction associated with a defect in the supply wire manifests itself in the appearance of clicking sounds at high volumes or in a rustling (“spark”) sound. Clicks, as a rule, appear when there is a large amplitude of vibration of the moving system due to the impact of the supply wire on the diffuser or centering washer. Usually it is enough to bend the supply wire correctly, and if this does not help, glue a piece of foam rubber to the washer or diffuser at the point of contact.
Rustling sounds arise due to the appearance of a fracture and its sparking, usually near the diffuser. If the lead wire is long enough, you can turn it over and secure it at the other end. Another way is to drag the worn part of the supply wire inside the diffuser or push it forward, securing it with a clamp. If this does not help, then you can make new lead wires as follows:
- twist them from two or three MGTF wires;
- thread three or four cotton threads into a screen braid with conductors of a suitable cross-section or into a “wick” to suck out tin when soldering;
- use Litz wire or thin stranded wire in insulation, designed for connecting speaker systems.
The most durable lead wires are made of Litz wire.
After soldering, the place where the supply wires are attached to the diffuser should be thickly coated with Moment-Crystal glue to avoid breaking. It is advisable to coat bare wires with Moment-Crystal glue diluted in a 1:1 ratio with solvent 650 or 646.
Voice coil repair
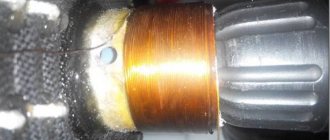
The main cause of noise (creaking, rustling, clicking) is the brushing of the sleeve (coil frame) against the core or the coil turns against the upper washer of the magnetic system. In addition to poor alignment, the reason may be in the sleeve itself, especially paper - this is swelling or kinks in the sleeve between the coil and the diffuser (photo 1), as well as the edges of the sleeve coming off the coil or foreign particles getting into the gap of the magnetic system.
To eliminate swelling, you need to make a small incision and use a syringe with a thin needle to inject BF glue or similar into it and smooth it out; If the delamination does not stick, then a mandrel is inserted into the gap.
The broken liner is impregnated with tsapon-la-com or BF glue and dried on a mandrel. Then, without removing it from the mandrel, the sleeve is glued on the outside (between the coil and the diffuser) with two or three strips of tissue paper, and after drying and removed from the mandrel, if necessary, ventilation holes are cut in it. The peeled edges of the sleeve should also be glued and dried by placing them on the mandrel. For the mandrel, use cylindrical objects of suitable size, brought to the required diameter with inserts made of lavsan film (glue does not stick well to lavsan).
If alignment is disturbed, the coil must be centered again.
Irregularities in the metal frame of the reel (sleeve) can be smoothed out from the inside with a hard object, for example, a pencil, a screwdriver handle, etc.
To remove foreign objects and dirt from the magnetic system gap, it is necessary to peel off the diffuser and clean the MS gap.
Weaker signs of noise (creaks, rustling, clicks) appear when the coil turns are partially peeled off.
Impregnate the unstuck reel with such types of glue as BF-2, BF-4, BF-19.
Centering washers (repair and replacement)
Washers can be a source of noise when peeling off or breaking.
A loose washer can be easily identified visually: both in the disassembled head and in the assembled structure, by moving the diffuser as far as possible in the direction from the magnetic system. To eliminate the defect, it is best to disassemble the head, peel off the washer entirely and “put” it back in its old place with “Moment 1” or “Moment-crystal” glue. You can do this without disassembling the speaker by applying an adhesive seam around the entire perimeter of the joint between the washer and the diffuser.
Sagging (elongated) washers can be easily straightened over a boiling kettle by holding the head being repaired by the diffuser and quickly turning the washer in a circle. At the same time, the spout of the kettle with steam is pressed against the washer in the direction of bending, as shown in photo 2.
“Tucks” (kinks across the wave of the puck) are eliminated as follows: fix the puck in the correct position, impregnate with tsapon varnish and leave until completely dry.
Kinks. Sometimes washers break near the cone, especially at the subwoofer heads. To repair small tears, simply coat them with Moment-Crystal glue.
A washer that cannot be restored should be replaced with a new one, choosing one that is close in size to the other heads. For example, a washer from 10GD-36 fits almost all dynamic heads with a diameter of 6...8 inches. The internal hole in the washer is enlarged to the required diameter (photo 3), and the excess waves at the edge are smoothed out with an iron, moistening the washer with water. The heat control of the iron should be set to “cotton”.
To obtain a more “elastic” bass, you can make the centering washer more rigid by impregnating it with zapon-varnish, bakelite or epoxy resin diluted with acetone to the desired consistency. After impregnation, coat the first two waves of the diffuser with Moment-Crystal glue to avoid kinks and give the washer variable elasticity. This impregnation slightly increases the resonant frequency and reduces sensitivity, depending on the degree of impregnation.
Diffuser
Diffuser repairs include repairing rips, punctures and bruises.
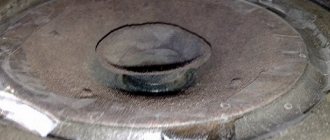
Most often, dust caps become deformed. Wrinkled caps must be peeled off. But under no circumstances try to straighten the cap by piercing or pulling out the dent with a crochet hook or other catchy objects. Woven caps can be ironed by softening them with steam. Paper or plastic caps are smoothed from the inside with hard round objects (screwdriver handle, teaspoon).
To secure the shape, the caps should be coated from the inside with hard varnish (tsapon-varnish, bakelite, NC). Punctures and tears in caps and diffusers can be coated with glue from the back and front parts, lightly sanding the material with fine sandpaper so that the paper dust, mixed with the exposed glue, fills the defect.
The gaps on the back side are glued with thin paper, and the joints are coated with slightly diluted glue. It is best to use methylcellulose (CMC)-based wallpaper glue, diluted to the desired consistency; PVA glue is also suitable.
Diffuser collar (repair and impregnation)
To repair a torn collar (corrugation) of a diffuser, it is better to use Moment-Crystal glue, diluted with solvent 646.650, or another elastic one, for example, rubber glue based on natural rubber, which is also good to use for impregnating the corrugation instead of guerlain [2].
Instead of guerlain, which gives a heavy, “greasy” sound, acrylic is ideal for impregnating a diffuser - it is acoustically neutral, waterproof and has good mechanical parameters. For thin and light diffusers, it is best to use Se-Neige-Sauna impregnation, diluted with water or black ink in a 1:1 ratio. The material is impregnated first on one side, and after drying, on the other. For the HF head, once is enough; for the LF-MF heads, the operation can be repeated.
After impregnation, the sound of the loudspeaker improves greatly: “elasticity” appears in the bass, “transparency” in the midrange, and “air” in the treble.
It is better not to soak more rigid diffusers, for example from woofer heads, but to paint them with acrylic varnishes “Senezh”, “Lazurit” (also diluted with black ink) using a spray bottle or, having diluted the composition very thinly, with a “Pony” brush in several layers with intermediate drying. In addition to the elegant black color, the dynamic head acquires a more “detailed” sound.
If you want to give your paper diffuser a nice black color, you can rub it with black shoe wax. If the wax is poorly absorbed somewhere, then this place should be greased with acetone and the wax should be immediately rubbed there. After drying, it is advisable to lightly polish it with a cloth swab.
Warning: diffusers painted from aerosol “car” cans lose their attractive appearance over time, as the paint falls off.
Kevlar and carbon fiber diffusers, especially cheap ones, often have a “caustic” sound from the mutual friction of woven fibers. In this case, the following impregnations help: polyester varnish, “Moment-crystal” or a thin layer of polyurethane foam. All impregnations are applied from the back to a pre-adhesive diffuser.
Any impregnation increases the mass of the diffuser, which entails a change in the parameters (primarily the resonant frequency) of the dynamic head, although, as a rule, changes are not required to the speaker filters.
Suspensions (repair and replacement)
The diffuser suspension (rubber and butyl) usually produces overtones if it becomes detached from the diffuser. Gaps (cuts) in the suspension are sealed with Moment-Second glue (cyanoacrylate), if necessary with diluted acetone.
Rotten foam rubber, dried woven, butyl and rubber airbags cannot be repaired, so they must be replaced with others.
In some cases, if the diffuser is severely damaged and cannot be repaired, you can select a replacement from faulty heads found on the radio market with other or lesser defects (coil breakage, deformation of the “basket”, etc.). This advice is, of course, suitable for repairing relatively common dynamic heads.
Literature
- Zodniev P. Diffuser suspensions. — https://www.podves.narod.ru.
- Zhbanoa V. On mechanical damping of diffusers. - Radio, 1988, No. 5, p. 41-43.
Author: P. Zodniev, Kazan, Tatarstan
How to restore speakers
Do-it-yourself speaker restoration
largely depends on its design and the nature of the malfunction. When using the speaker system, the following defects may occur in the heads:
- Electrical breakdown of the coil
- The occurrence of short-circuited turns
- Winding damage
- Diffuser rupture
- Dirt getting into the gap of the magnetic system
If there is no sound in the speaker, you need to check the integrity of the voice coil winding using a tester. The resistance of the voice coils is small and the tester can only make sure that there is no break. The presence of short-circuited turns in a 4 or 8 Ohm coil will require special measuring instruments. After removing the diffuser and centering washer, the burnt coil is immediately visible.
If the enamel insulation of the wire has become very dark, this indicates that there may be short-circuited turns in the center of the coil and it will have to be rewinded. There are cases when, due to strong vibration of the voice coil, part of the turns comes unstuck and falls off the coil in a ring. In this case, they can be carefully returned to their place using tweezers and then glued. DIY car speaker repair
associated not only with coaxial, but also with component devices.
Such acoustic systems consist of three speakers and a crossover. A crossover or LC filter block divides the audio range into three frequency bands, each of which is fed to its own speaker. Repairing a component speaker
does not differ significantly from repairing other models.
Repair damage to speaker cone
Acoustic heads with low output power can be restored using ordinary paper tape. Such a patch will prevent the hole from enlarging due to vibrations and will not have a significant impact on the sound quality. Repairing a torn speaker cone can be done in a more reliable way. In this case, a paper patch is applied to the prepared hole, and nail polish is used as glue. This option is often used in rural areas where it is difficult to get good glue. Nail polish provides good rigidity and reliability of the gluing area.
One of the most popular gadgets is a laptop. If you use its sound channel at maximum volume for a long time, then noise, wheezing and distortion may appear in the speaker. Repairing a laptop speaker cone is a difficult task, so only a specialist can handle this matter. First you need to make sure that the reason for the bad sound is the built-in acoustics. To do this, just connect external speakers to the output connector. If the sound from the speakers or headphones is of good quality, then the problem is the built-in speakers. Acoustic heads used in laptops are small in size and have plastic diffusers.
You can restore the membrane with your own hands, but the sound quality will be noticeably worse, so if the built-in acoustic heads of the laptop are damaged, it is better to replace them.
Speaker restoration
A common defect is diffuser rupture. Repairing a torn speaker
with your own hands is to restore it. There are different reasons for diffuser damage:
- Wear and tear due to prolonged use
- Mechanical damage
- Voice coil compartment
As a result of wear and tear on the diffuser or exposure to moisture, ruptures may occur. This causes the sound in speaker systems to become distorted. In this case, repairing the acoustic speaker
possible by placing a patch on the damaged area. Despite the density of the diffuser, for its restoration you need to use soft paper such as newsprint. A4 office paper is not suitable for this purpose. Elastic glue is used to glue the patch. It could be PVA or something similar. The back side of the diffuser at the break point is coated with glue. Then a small rectangle of soft paper is coated with glue and placed on the back side of the tear. The paper must be smoothed carefully using a round and smooth object.
If the gap is large, then strips of paper are glued so that they overlap each other and extend onto the undamaged segment of the diffuser. After leveling and smoothing, a second layer of paper strips is applied. From the outside, the crack site is coated with glue. There should be no excess glue, so wipe the diffuser with a soft cloth. The finished structure must dry for at least a day. After complete drying, the quality of sealing and the free movement of the diffuser are checked. If the gluing area turns out to be thinner than the rest of the material, then the gluing procedure must be repeated. Different thicknesses will lead to a tear forming in this place again. The final quality check involves feeding a piece of music from the amplifier output to the speaker. It is best to listen to an excerpt from a symphonic work, since almost the entire frequency range is present there. Car speaker repair
is performed according to a similar scheme.
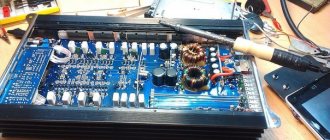
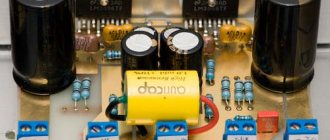
Device and troubleshooting
Subwoofer 5, 1 consists of a speaker, speaker, and amplifier, as well as a power supply:
- An acoustic speaker usually fails only from mechanical damage.
- Failure of the dynamic head is caused by the contact of its coil with an audio frequency with a power for which the head is not designed, or with constant voltage, which causes the coil to burn out
- When listening to a speaker with amplification at maximum power, you will encounter the problem of wear (rupture) of the driver cone
- If the speaker breaks, it must be replaced, since rewinding the coil or repairing the subwoofer diffuser is a delicate, painstaking job and it is very difficult to do it efficiently so that the sound does not deteriorate
First you need to find out which element of the subwoofer failed:
- A common cause of power supply failure is impaired heat exchange.
- The huge amount of dust that gradually accumulates inside the unit causes the parts to overheat and cause them to fail.
- Using a tester, we check whether there is voltage at the output of the power supply; if there is no voltage, then you can be sure that the reason lies therein
- When inspecting the parts of the power supply, you may find swollen capacitors or blackened transformer windings
- Using a soldering iron, unsolder damaged parts and replace them with new ones purchased at the store.
- You can rewind a burnt-out transformer with your own hands if you already have experience in such a matter; if you have no experience, it’s better not to take it on, or practice on something you won’t mind
- If there is voltage at the output of the power supply and it does not deviate from the specified norm, then you can move on to the low-frequency amplifier
- A board with an amplifier is a place where, as a rule, there are a lot of transistors and microcircuits. Using a tester, carefully touch the outputs of the microcircuits, measure the voltage
- When they are cold at normal supply voltage, there is probably no current in them, it should warm them up
- If the chips are hot on the contrary (they are usually slightly warm during normal operation), this is a sign of a malfunction
- Using the same analogy, we check all capacitors, swelling, hot surfaces are symptoms of their unstable operation
- The diffuser can be sealed with a back strip of tape, (preferably thin cardboard) the edges, while the edges of the material being glued need to be thoroughly coated with rubber glue so that the glue sticks out on the surface of the diffuser, repairing the subwoofer suspension (see How to glue a subwoofer so as not to buy a new one) this is complete
- Dry it for a day, then check the operation at low and medium power; if the sound is bad, it’s easier to replace the entire speaker than to bother with replacing the diffuser
- Replacement is a long, labor-intensive process that does not provide any guarantees of high-quality sound, plus - one careless movement, and the new diffuser will also be destroyed.
Do-it-yourself repair of pop-up speakers
Sound amplification equipment used in concert venues uses powerful, full-range speakers. Their design differs slightly from conventional models. Since they are designed for power of tens and hundreds of watts, they have a denser diffuser mounted on an elastic rubber suspension. Audio speaker repair
includes voice coil restoration and diffuser repair.
Rewinding the speaker voice coil
When loudspeaker systems are operating efficiently at maximum volume levels, it is rare for a sound system to burn out neatly and in one place. Usually, after disassembling the loudspeaker, black and charred coils are visible. If the frame is made of paper, then it also burns badly and needs to be replaced. Special paper is used as material for the sleeve. There cannot be specific recommendations here, since the material that is at hand is used. Thin aluminum foil with a diameter of 0.05-0.1 mm is well suited for making a voice coil sleeve. The base will be light, and thin metal will remove heat better.
The most important thing when winding is the use of appropriate glue. Very often, after restoring the voice coil, the loudspeaker, after some time, failed again. The winding did not burn out, but its turns slipped off the sleeve due to the fact that low heat-resistant glue was used during operation. Many modern adhesives soften at temperatures of 80-1000C, so the result of the work depends on the choice of glue. Alcohol-based glues such as BF-2, BF-4, BF-6 give excellent results, but they are difficult to obtain. For low-frequency and high-power loudspeakers, aluminum foil from soft drink cans is a good material for the sleeve.
Speaker repair
When repairing woofers with your own hands, you need to know how to disassemble them so as not to damage the speaker system. All work must be done strictly sequentially. First, remove the dust cap. Since it is glued with synthetic glue, acetone or another organic solvent is used to dissolve it. It is necessary to carefully moisten the rim of the cap with solvent until it can be removed.
Then you need to unsolder the wires coming from the voice coil to the contact panel. After this, treat the edges of the protective ring and rubber suspension with acetone. After some time the diffuser will come off. After this, the centering washer is carefully trimmed and the diffuser, together with the voice coil, can be removed from the magnetic system.
Acoustic speaker repair
When repairing acoustic speakers with your own hands
The most difficult process will be rewinding the voice coil. This is labor-intensive and delicate work. After the diffuser along with the coil is removed from the housing, you need to carefully wind up the burnt or torn wire. You don’t have to count the turns so as not to get lost. It is enough to measure the length of the wound wire and measure its diameter with a micrometer to select a similar piece. To wind the coil, you need to use a mandrel of the appropriate diameter onto which the voice coil is placed. This way you can avoid creasing the paper frame. The voice coil is wound strictly turn to turn. For fixation, it is best to use BF-2 glue.
Once the coil has completely dried, the assembly can be assembled. With a little experience, the answer to the question of whether the speakers can be restored will be positive.
How to make a speaker winding
Winding speaker coils is a delicate and responsible job. Whether the loudspeaker will work or will have to be thrown away depends on the quality of its implementation. First, the old winding should be wound, while counting the number of turns. This data will be useful for winding a new product. If the wire has not burned out or crumbled, you can not count the turns, but measure the length of the wire. Then its diameter is determined with a micrometer and, based on these data, the wire for rewinding the speaker is selected. It often happens that the paper sleeve is badly damaged. In this case, you will have to not only change the winding, but also make a new frame yourself. In order for the production of the sleeve and winding to be successful, you will definitely need a mandrel on which these works will be carried out. Using a mandrel will make the work more convenient and prevent the paper core from deforming during the winding process. If rewinding speakers with your own hands is a one-time operation, then a mandrel of the required diameter is made from any material that can be easily processed. Those who regularly repair loudspeakers will need a set of metal split mandrels.
The cut is needed so that the mandrel can be slightly compressed and the finished product can be removed from it.
Do-it-yourself speaker repair without disassembly
Speakers that are built into acoustic systems can experience not only internal defects, but also external ones. Most often, this is a loosening of the speaker mounts to the front panel of the speaker systems. This causes extraneous noise in the speakers and disrupts the acoustic picture. This happens especially often in car sound systems. If the fastening becomes loose, you need to remove the false panel and tighten all connections. If there is no sound from the speakers, this is often due to a break in the wires running from the amplifier to the speakers. Therefore, before opening the acoustic module, you need to check its functionality.