The confrontation between the pleasant-to-hear sound of a tube guitar amplifier and the weight and size characteristics leads to one logical conclusion - a hybrid amplifier circuit. And although this method cannot achieve the sound of full-fledged tube amplifiers, you can get fairly high-quality sound using simple circuitry and small sizes. I made the combo whose amplifier is described in the article for my father, based on such characteristics as good sound quality, low power consumption, low weight and dimensions. The combi is intended for home use and, therefore, there is no need for high power. I would like to note right away that my research here is very limited. This is just a compilation of known schemes. However, for some reason I never saw this anywhere when I was a beginner, and I don’t see it now. Everyone was just giving verbal advice, and no one could make a circuit or board. But my hands have grown...
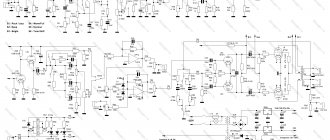
↑ Amplifier circuit
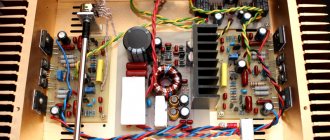
The amplifier circuit itself can be divided into 3 parts: preamplifier, buffer and power amplifier.
It took me a long time to choose the preamplifier circuit, because I had to achieve good quality at a minimum price and power consumption. I also didn’t want to make large transformers. But I had 2 Soviet TAN-11 lying around with four windings of 28 Volts and two of 6 Volts. These are the ones I decided to use. But the anode voltage turned out to be small. There was only one way out - to use the famous TOMATO preamplifier. Over several years of work at my home, this preamplifier has never failed, and turned out to be very unpretentious and of high quality, despite its simplicity. The question of the buffer did not arise; I used the standard circuit on the TL072 operational amplifier, connected with K.U. = 1. I decided to make the tone block like a Fender one, I really like it.
As a UMZCH I used TDA2005, switched on in bridge mode.
Here's what we ended up with:
↑ Parts used
In the preamplifier, capacitors with an operating voltage of 250 Volts are used, in the tone block and further on the circuit is 50 Volts. Capacitors in the cathodes of the halves of a 50 Volt lamp. It is advisable to use a 2.2 uF electrolyte that is unipolar, or even better, no electrolyte at all . I used ceramic 1 ohm resistors shunting the speaker, with a power of 5 watts. However, smart people say that such power is completely unnecessary.
Materials used
- Waterproof hardwood plywood 14-20 mm. Chipboard is not recommended.
- The best upholstery is natural or artificial leather.
- Wood glue, brush, matte black acrylic paint.
- Speakers 50 W 8 or 16 Ohm, depending on connection method.
- Screws with strips 25×25 to strengthen the walls
- Plastic or metal lettering.
- Carrying handles and legs on wheels.
↑ Anode power
With anode supply and filament it is a little more complicated, but only a little. The main question was how to connect the TA-11 transformer.
However, thanks to the information that is on the Internet like snow in winter, it was possible to connect 3 windings of 28 Volts in series for the anode. It turned out ok. 84 Volts alternating, and then rectification and a voltage doubling circuit.
In the anode rectifier I used capacitors uprooted from old computer power supplies. They are rated at 200 volts. Now someone will touch their hearts, saying that the voltage is not enough, however, my PSU exhaust under load turned out to be about 170 Volts. So for the first time you can definitely use
The sound of a amp
After connecting the loudspeaker to the amplifier, you can see a huge difference in sound compared to Chinese equipment, so to speak, of the “base price”. Just a completely different sound from the same guitar!
After connecting to a 50 W tube amplifier, everything plays cleanly, nothing is distorted. It can be seen that the quality of the speakers and the rigidity of the cabinet finish are extremely important characteristics.
↑ Printed circuit board
The board is also a compilation of ready-made ones, with my small contributions and adjustments.
I came across the TOMATO preamplifier board by chance through Google. The board developer could not be installed. Power amplifier board for TDA2005 from the project of the same name on the website guitar-gear.ru. Everything else is my sculptures, in some places mediocre, otherwise simply terrible. The large square in the drawing is the place for cutting. That is, there shouldn’t be any fees at all. The jumper in the tone block is made from the side of the tracks with a canopy. This is an already adjusted board, initially I got it like this:
Ignore the 2 back-to-back diodes and 2 of the same LEDs on the outside. These are just my experiments, so the topic of this amplifier is not closed yet. Initially, the amplifier was planned to be designed in the form of a “head”, but the idea quickly grew into a combo. But the board has not been redesigned. Therefore, the handles are swapped, and the connector is on the right, and not on the left, where it belongs:
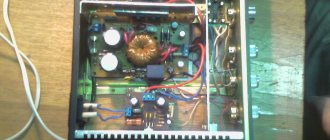
The finished structure is mounted on an L-shaped chassis, which is attached to the rear of the combo.
Please ignore the dirt. Everything is in a state of completion/refinement/finishing.
Assembling an AC amp
The most important element in manufacturing is choosing the right "package" for the speakers being used. This affects the final sound of the speaker. The incorrect choice of these parameters leads to the fact that the loudspeaker itself makes strange sounds and has overtones. After calculations and practical changes, it was time for carpentry work.
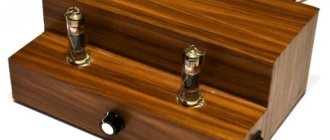
A slanted type of placement was used here due to the location of use - the home - so that the speaker "speaks" directly to the performer, and not to the floor. A set of acoustics for a guitar with a power of 120 W was used, you saw the photo of the speaker above.
The back has been cut 1/3 of the width due to the speaker being half-open, this is where the tuning grid inserted into the frame sounds best.
Wrapping the column took all day. If you want, you can use transport wheels or rubber feet with adjustable threads to level them on the floor. The speakers are secured with M6 screws with self-locking washers to prevent them from loosening due to vibration.
25x25mm strips were glued and screwed inside to stiffen the structure against strong vibrations. For an aesthetic finish, the front was made of wood, called a quarter circle, cut to size. The center was painted with matte black acrylic paint, then all the finishing materials were trimmed and now the speakers could be screwed in. Specific dimensions are not given as they depend on calculations and the type of speakers used. After assembly, here are the final photos of the work.
You can connect the speakers to each other inside the column in different ways:
- MONO 16 Ohm / 120 W (connect speakers in series 8x2 Ohm = 16 Ohm)
- MONO 4 Ohm / 120 W (connect speakers in parallel 8/2 Ohm = 4 Ohm)
- STEREO 2 at 8 Ohms at 60 W, for this we use the mono / stereo switch on the rear panel.
Disassembling and taming tube guitar sound
How it all began
About 5 years ago, I began my journey through the world of lamp technology. During this time, dozens of different circuits were assembled and about five dozen “original” tube amplifiers were listened to. As a result, a clear understanding of “how it should sound” and what kind of “flexibility” the device should have was formed. In the process of getting to know different guitar amplifiers, for a long time, I was not left alone by the sound of the “head” from the Krank company. But at that moment, unfortunately, it was impossible to evaluate it and try it. Sales had just begun in the States, but there were no live copies in St. Petersburg. It was decided to get such a “tidbit” no matter what. Fortunately, suitable people were found who were able to buy and bring it to St. Petersburg. Long 14 days of waiting and my beauty stood on the threshold of the apartment. Happiness knew no bounds. The more I played it, the more I was overcome by the thought: “How does this thing work.” At one fine moment, gathering my courage, I firmly decided: “I must find out the “secret” of this miracle.” Days passed, weeks flew by. Piece by piece, a pattern emerged.
It would seem worth stopping at this point, but the soul demanded continuation. And so the idea was born to make a portable, lightweight “krank” for playing outside of rap. points. And then it started...
Frame
It was decided to take the case in rackmount format (for ease of storage and transportation). Pros of the solution: Ease of installation in a rack/studio rack, durability, good cooling, ease of location and internal wiring. The case used was Hammond 2U 19″ Rack mount Case.
Transformer
I’ll say right away that many transformers were tried, but Transled turned out to be the most adequate in price and dimensions (don’t take it for advertising).
I chose a power transformer based on the following parameters: 3 lamps - 12ax7, switching and indication.
In total we have: 1. A 6-15 volt winding for powering incandescent lamps and switching. 2. High-voltage winding to power the lamp anodes.
We open the datasheet of the 12ax7 EH lamp and see: Heater - 150ma(12.6v) or 300ma(6.3v) Anode - 10ma. Indication and switching - 200ma.
Total minimum:
Winding 6.3v - at least 1.2A Winding 260-300v - 30ma
With reserve:
Winding 6.3v - at least 1.8A Winding 260-300v - 50ma
Advice:
Under no circumstances use “flip-flop” transformers for power supply. It has an extremely negative effect on the sound and background. Take the transformer with a reserve, because working within the limits results in overheating. The insulation dries out faster, which leads to troubles and wasted time. Desirable nutritional reserve ~ 20-25%. There have been cases when, due to the power supply, a very strong background appeared in the sound.
power unit
After much research, I came to the conclusion that the filament power supply (for hi-gain) amplifiers must be stabilized and rectified. For my preamplifier, I used a power supply based on an Lm317T adjustable voltage regulator.
Components
I bought all the components in an online store (in Canada). Although, by and large, it doesn’t matter where they were purchased and from whom, the main thing is to adhere to simple rules: 1. Electrolytic capacitors noname and “completely Chinese” - do not take them. (I recommend companies like Nichicon, Jamicon, Hitano, Vishay, Silver mica, Sprague.) 2. Don’t save money on wires. For switching and timbre. I recommend our MGTF block, for power parts (power supply) you can use MGShV. 3. Do not use ceramic capacitors in hi-gain preamps and amplifiers. Most often they introduce a “ringing” into the sound. I advise you to use Silver mica or our Soviet mica capacitors (SGM, KSO are very good). 4. Feed-through capacitors (capacitors along the anode circuit) and into cathode circuits are best used with a film or polystyrene dielectric (Wima, Rifa, Epcos are very good). 5. And of course, take everything with a voltage reserve of 20-25%.
Lamps
Absolutely any 12ax7. Personally, I prefer the 12ax7 EH for tight, medium readable overdrive. 12ax7 Tung Sol for a clean channel or mixed with EH for more detail in the high mids and treble when driven.
Printed circuit boards and their manufacturing technology
Tell me honestly? It is advisable to manufacture all lamp equipment on a turret board. But due to the fact that we do not manufacture hi-end, good old printed circuit boards based on foil PCB will do. For lamp circuits, I use one-sided, one and a half millimeter textolite, with the thickest layer of copper foil. As a rule, I print a blank (stencil) of a printed circuit board on transparent film. I clean the textolite plate with foil with fine sandpaper, wash it with soap under running water, degrease it, wipe it dry. I spray an even layer of POSITIVE 20 onto the surface and place it in a dark place to dry. After 5-7 hours, I lay out the stencil and illuminate it through the plexiglass glass with a 150-watt halogen spotlight for 1.2-1.5 hours.
Next, I dilute 7g of sodium hydroxide per liter of warm water and mix. I throw our exposed board there and stir the water so that the exposed photoresist dissolves more actively. In common parlance, I show payment.
Next, take a tray, fill it with boiling water, throw in ferric chloride and etch out the board. At the end of the procedure, we drill holes and conduct a session of soldering the elements.
Assembly in the case and tips for setting up
We mark places for installing “racks” for mounting the board. We drill holes and secure the posts. Let's start assembly. As a rule, I start assembly with the tone block, since I prefer to partially seal it with a canopy. As a rule, try to fasten the wires with ties.
Simple assembly rules:
Do not bundle signal and power wires into one bundle, otherwise problems with the background will occur. Try to conduct the filament circuits of the lamps in a “pigtail”. Always conduct lamp grids in shielded wires. Input and output wires require shielding. It is advisable to ground the input connector (signal contact) when the guitar is not plugged in. Bring the lands to one place on the hull. Make sure that no earth loops are formed. Solder the filament contacts through 100 ohm resistors (0.5w) to ground. All the above “recipes”, if the board is correctly routed and assembled without errors, will give a quiet amplifier and a sound pleasing to your ears. Thanks to all.
PS
I hope I didn’t bore you too much with this long article. If you have any questions, write. I almost forgot... The secret was that the new is the well-forgotten old. Krankenstein turned out to be a 90% copy of the marshal, with almost unnoticeable changes in the preamplifier and a 6L6 WGC terminal.
Links
Archive with diagrams and a signet made in sprint layout 5 Video (Distortion chanel) Played and recorded by a friend. Video (Clean chanel) Audio Wrote in line. Focusrite saffire card.
Basic Control Panel Functions
A modern guitar amplifier has a fairly complex control panel with a large number of controls. There are three main ones:
- volume level;
- degree of overload (if this effect is built-in);
- sound frequencies (there may be several of them: bass, treble, middle).
Using the controls, you can adjust the sound to your liking: make it softer, change the timbre of the instrument, or set a significant degree of overdrive. It is best to choose amplifiers that provide all of the configuration options listed above.
Tone block for low and high frequencies
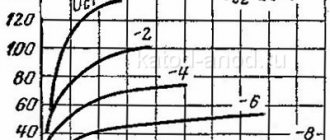
The equalizer is a passive circuit with a characteristic activation. It introduces attenuation of just over 20 dB, which is compensated by a fairly large gain of the power amplifiers (40 dB instead of the usual 26 dB). The components were selected for this specific design and the characteristics can be seen in the graph.
Useful: Shock or vibration sensor module for car alarm
Frequency response of the LF-HF tone block
Of course, the frequency range starts just above 100 Hz, but this is normal for a guitar. You can also make a second input, without a tone block - directly to the ULF. The 470n capacitor should be chosen to suit your taste: this value provides full range transmission, but due to the lower value of this capacitance it limits low tones, this gives more power in the upper range. It would be nice to put a low-pass filter there, because a roll-off of only 6 dB per octave unnecessarily loads the speaker.
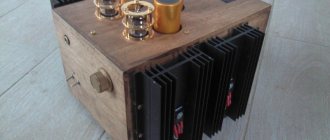
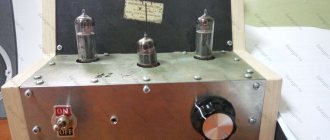
Photo of the ULF housing
Homemade battery-powered combo
The body is made of a 10 mm thick board. They look better than plywood, not to mention MDF boards and the like. Small size – 20x20x15 mm. All this is painted with a thin layer of so-called “velvet” varnish. Aluminum foil shielding is used around the plate, to which the potentiometer housings are also connected. Before screwing the speaker, we put a thin cloth on it, which we then trim. At the back there is a regular audio input jack, and the power supply for the power supply is also located there. The power switch is located in the volume control.
JFET Input Stage
The input stage is a Class-A VLF based JFET preamplifier with high input impedance and medium output. JFET preamps have become very popular in guitar circuits because they are simple, easy to build, and capable of delivering warm tones.
D3 and D4 are 5.1 V zener diodes with a power of 1 W. They provide surge protection against static discharges and clamp the input signal if the level exceeds ±5.1 V. They are optional. Part 1N4733A is used here due to its easy availability, but any 5.1V 1W zener diode such as the BZX85 5.1V can replace it.
R1 senses the input resistance and connects the JFET's gate to ground. The resistor value is not critical, 100 kOhm to 2 MOhm will work. R2 is the source resistor, it determines the ID bias current through the FET, and R3 is the drain load resistor.
At this ideal midpoint offset, the gain is limited by the values of RD and RS, which in turn are limited by the internal characteristics of the JFET. The RD and RS values can be adjusted by ear to obtain the best sound.
What effects can you create?
Many amplifiers are capable of creating the sound effects needed for studio recording or home rehearsals. Most often there are two of them: a clean sound (similar to an acoustic guitar) and an overdrive (gives the instrument a rock sound with overdrive).
The switch from one effect to another is most often located very inconveniently, so it is best to purchase an additional guitar processor. It is a pedal with which you can change sound settings while playing. With its help you can get even more effects.
What categories are amplifiers divided into?
According to its structure, a guitar amplifier can be of two types:
- combo;
- stack.
The former are a single box that houses both the audio system and the signal converter. As a rule, combo amplifiers have low power. However, among them there are a large number of options capable of producing high-quality sound. Stacks are professional equipment: in them, the speakers are located separately from the amplifier itself.
If you purchase equipment for rehearsals at home, then just buy a combo. Stacks are more suitable for performances and recording studios. They are much more expensive, but produce high-quality sound. There is no point in buying them for your home, since they only show their capabilities at a volume level of half the nominal volume. For example, if it is stated that a guitar amplifier is capable of delivering a power of 100 W, then you will be able to see all its positive qualities at a volume of 50 W.