Greetings, friends! Almost six months have passed since my first publication on creating a homemade vinyl player. In fact, this can be explained quite simply: I was working on perhaps the most complex and time-consuming part of the player - the body. A lot of time and effort was spent, but the result is worth it. Well, now let me try to explain what I’ve done here...
Without the risk of breaking anything
Despite the fact that today the number of vinyl and record players sold is steadily growing, newly minted vinyl lovers still have difficulty getting their brand new turntables into operation. This article is addressed to them - we will tell you how to connect the player to an existing system, whatever it may be. Let's consider two scenarios.
You bought an all-in-one player
This means that it already has a built-in phono stage - without which you won't be able to hear anything at all - and the pickup head with stylus is mounted on the tonearm. All geometric settings are pre-made at the factory, and you do not need to understand the intricacies of setting zero error points according to the template, setting the azimuth and vertical tracking angle, as well as anti-skating.
So, here's what you need to do:
1. Place the player on a flat surface - a shelf or stand
2. Install the disk on the spindle
3. Throw a belt on the motor pulley (if the turntable is a belt)
4. If the head and needle are supplied on a separate shell, secure the shell to the tonearm without removing the protective cap from the needle
5. Install the counterweight on the tonearm
6. If the counterweight is calibrated - that is, has tracking force values printed on it - then set it to 0, while the tonearm should be balanced. Then set the value recommended by the manufacturer - usually from 1.5 to 2.5 grams
7. Make sure the built-in phono stage switch is in the ON position
8. Connect the player using interconnect cables to the LINE IN input of an integrated amplifier, pre-amplifier, receiver or active speaker systems
That's it, you can put the record on disk and listen to music
You bought a turntable without a phono stage and cartridge
As a rule, a turntable in this form is bought by experienced users who know how to select and configure it, as well as which phono preamplifier to buy. If you nevertheless decide on such a feat, then in addition to the steps described above, you will need to install the head on the tonearm, and also acquire a phono preamplifier - built into the amplifier/receiver or external.
So, installing the pickup head on the tonearm:
(!) Try to perform the installation wearing clothes without long sleeves (!)
1. Remove the head from the package without removing the protection from the needle
2. Place the head on the end of the shell and secure it with the screws without tightening them too much
3. Connect the shell wires to the terminals on the head according to the color coding
4. Then, using a template, you need to set the zero error points. Usually the template is included with the vinyl player; if you don't have one, you can download it here.
5
Please note that at two points the needle holder must exactly coincide with the corresponding mark on the template; when it deviates, turn the head along the vertical axis in the desired direction. 6
Then use a mirror or the back of a scrap CD to set the azimuth. When installed correctly, the reflection of the needle should be in a straight line with the needle itself when viewed from the front
6. Then use a mirror or the back of a scrap CD to set the azimuth. When installed correctly, the reflection of the needle should be in a straight line with the needle itself when viewed from the front
7. The vertical tracking angle (VTA) can be set if the tonearm has an adjustable base height. For most cases, it is enough to ensure that the body of the head and the record are parallel (if the head has a rectangular body).
8. After setting the downforce level, you can set anti-skating. We recommend that you first set it equal to the amount of tracking force, and then gradually adjust it downwards, noting the changes by ear.
Next, connect to the built-in or external phono stage and enjoy the music!
Source
↑ Finishing
After sanding and removing all surfaces, the parts are ready for veneering (veneering).
A few words about veneer glue: veneer can be glued with almost any wood glue, but you need to take into account the peculiarities of gluing technology. The most popular options are the following. 1. PVA glue.
The main feature of working with this glue is the need to keep the parts being glued under pressure for a long time, so this glue is used for veneering large flat surfaces. It’s not suitable for my case because of the small elements along the edges; I just don’t know how to securely press the veneer to them.
2. Special contact adhesives for wood.
These include 3M Fastbond 30NF, KLEIBERIT 114.5, KLEIBERIT 152.0, etc. This is the best option for veneering, but I could not find this glue in a small package, only in large cans. I don’t need such a quantity, and they are not cheap. The technology of working with contact adhesives involves applying a layer of glue to the surfaces to be glued, drying and then gluing. Moreover, gluing is achieved under short-term strong pressure. A few seconds are enough, so the rubbing method is successfully used to work with contact adhesives. This is done using a special lapping bar, which is constantly moved in the direction of the fibers. Due to the small contact area, quite a lot of pressure is created, sufficient for reliable bonding.
3. Universal contact adhesive
(Moment, 88). The technology of work is the same as with the previous group, and the price is much lower. In addition, I looked at several examples of veneering with glue 88, and I was satisfied with everything. We will use it.
So, apply a thin layer of glue to both surfaces to be glued
If the glue is strongly absorbed, you can apply a second layer 10-15 minutes after the first. After the glue has dried (5-10 minutes), we place the veneer on the plywood and begin lapping. The lapping process begins in the middle of the sheet, gradually moving the tool to the edges. If it happens that not all of the base is covered with glue, bubbles may form, to eliminate which you will have to cut the sheet with a blade and introduce a small amount of adhesive under it. After this, the veneer is processed again with a lapping block.
After this, we leave the part for 24 hours for final gluing. After 24 hours, the excess veneer along the edges is carefully trimmed using a sharp construction knife. When all surfaces are covered, we begin the final sanding of the veneer. In this case, all uneven edges after trimming are removed, the surface of the veneer is leveled, the joints of the veneer sheets in the corners are smoothed, etc. The technique is the same as when preparing for veneering: sequential sanding with sandpapers P320 and P600.
The final stage of processing is coating the veneer with varnish or natural oil to give it an even more attractive appearance and highlight the wood texture. I used SAICOS colorless natural silky matte oil. In my opinion, this is the best option.
The result is such beauty.
I also decided not to leave the internal non-visual surfaces in the color of plywood. Initially it was planned to cover them with walnut-colored stain
It turned out that the “NUT” color stain is very far from walnut. But this, in principle, is not that important for me. I mixed several stains of different colors and got a closer look.
But when applying it to other planes, another problem appeared - in places where glue got on the surface (when gluing plywood, as well as when gluing with veneer), the stain is not absorbed into the wood, and light spots form!
It all doesn't look very nice, but I decided to leave everything as it is. There was an idea to paint all these insides with a black helmet, but I was afraid of ruining the veneer. From my experience, no matter how much you cover the edges with paint, something will still leak somewhere. Therefore, I will focus on this option; anyway, nothing will be visible when assembled.
Manufacturing
To make such a cunning device without a lid, you must first prepare a number of tools and materials. For production you will need:
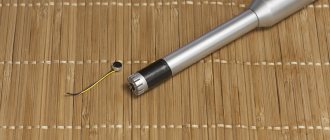
- filament motor (linear motor with a large number of magnetic poles);
- plywood (2 sheets) 4 and 10 cm thick;
- tonearm;
- valve with guide part;
- 5/16" steel ball;
- bolts;
- liquid Nails;
- pencil;
- compass.
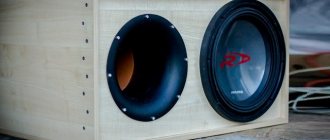
The manufacturing scheme is as follows. First of all, you should deal with the plywood - it will play the role of a stand. One part is necessary to support the motor, and the second - the turntable and tonearm (pickup). The first part of the stand should have dimensions of 20x30x10 cm, the second - 30x30x10 cm. You need to make legs for the bottoms of the stands - small cylinders, possibly made of wood.
It is necessary to open a hole in the turntable stand at a distance of 117 mm from the edge and 33 mm from the adjacent edge. It must be end-to-end. The valve guide should fit into this hole. The hole must be sanded to remove any possible roughness. After the hole is prepared, it is necessary to glue the guide part with liquid nails, and then lower the steel ball into it.
The next stage is the production of a pinwheel with a diameter of 30 cm. It must be made from the remaining sheet of plywood 4 cm thick. The pinwheel should be perfectly round. Be sure to mark the center of this piece with a pencil. After this, you need to attach the valve to it with the wide end using 8 bolts. As soon as the preparatory activities are completed, the turntable can be attached to the box.
↑ Housing assembly
The next step that needs to be done is to glue all the layers in accordance with the model.
I glued it with PVA glue. Apply glue in an even thin layer on both surfaces to be glued and press the parts tightly together. You can place them under a load or use clamps. Leave for 24 hours for the glue to dry completely. After gluing all the layers, we get both parts of the body almost ready. It remains to do a little work with the milling cutter to complete the geometry.
Level all the side surfaces, because due to errors during milling cutting, a small “ladder” appeared on the sides. I was promised a deviation of up to 0.2 mm, but in fact it turned out to be up to 0.5 mm. It is convenient to level the side surfaces using a copy cutter.
This is best done on a router table, but I don't have one, so I did everything by hand. That is why minor defects could not be avoided during processing. Due to the fact that the supporting area for the router is small, sometimes the router swayed a little, and such potholes formed
Fortunately, all this can be easily eliminated with putty.
You need to make bevels at 45° along the ribs. It seemed to me that a body in the form of a simple parallelepiped would look a little banal, so I decided to add a few bevels along the edges for a better appearance. In my opinion, it turned out well.
In the top layer, cut out a window for the control panel board. For some reason I forgot about it when I was drawing the layout for cutting, and they didn’t make it for me. Therefore, you will have to do it yourself. The element is not visible, it will be covered by a decorative panel, so special precision is not needed here, as long as the board passes
After all these modifications and elimination of defects, the parts should be completely cleaned with sandpaper and prepared for veneering. I recommend cleaning sequentially with sandpapers of P320 and P600 grit.
Large flat areas can be easily sanded with an eccentric sander.
Small surfaces were sanded manually using a small block. Internal surfaces of large diameter can be easily sanded using a blade attachment for a screwdriver (drill)
Benefits of Test Vinyl Records
Nowadays test plates are a very common thing, it is not difficult to purchase them, but in practice two questions often arise. First: which record should I choose? Second: which of its capabilities can be used and how?
What exactly is a test plate? The vinyl disc on which the test signals are recorded has specialized tracks for determining tuning parameters or adjusting them. There are also discs, for example, with empty areas (just smooth surfaces). Usually, each manufacturer accompanies its publication with detailed instructions, although these instructions are not always in Russian, and for some this can be very critical - the same auto translators cope with such technical texts very mediocrely. But if you set your mind, you can find something online for almost every publication. It is also worth remembering that when you study all the potential capabilities of the test discs and select the desired parameters, it is not a fact that you will be able to find everything on one edition - after all, the set of tracks and features on different discs is different.
01. Cardas Frequency Sweep and Burn-in Record - 1600 rub. Not a bad disc, but not universal. 02. Image hifi Vinyl Essentials - 2200 rub. 03. Hi-Fi News Analogue Test LP - 2650 rub. One of the most convenient test plates, and the kit is good - in addition to the plate, there are also simple templates included in the kit. 04. Analogue Productions The Ultimate Analogue Test LP - 2400 rub.I'll try to summarize what might be needed in practice. The most basic capabilities, almost always these are the first tracks on the first side - determining the correct channel connection and correct phase. Yes, both are worth checking; in practice, errors are not so rare. The next very convenient opportunity is to measure the resonant frequencies of a specific path, namely your head on your tonearm. It is no secret that not all tonearm manufacturers indicate the effective mass and not all heads are equipped with data on the compliance of the stylus holder. Namely, these values, in combination with the mass of the head, will give the values of the resonant frequencies, and check whether you fall within the permissible range or not, maybe something should be adjusted, decide on the choice of head, if the existing one is not suitable - here All this can be done with just a couple of test tracks on the record. An extremely useful feature.
What else might be useful? Tracks for setting anti-skating, more precisely for measuring the correctness of its settings, and zero “varnish” tracks. They can also be used to adjust the head position and anti-skating, but do all this not by ear, but by eye. And if you can adjust the geometry using a template, then with regard to anti-skating, with different features of the tonearm, head and its needle, one or the other method may be more informative. These are the main features, but there are usually more than a dozen tracks on the disc, and if you wish, you can master the use of all of them, if there is a need and you are confident that you can interpret all the data received correctly.
↑ Preparation of materials
This time I decided to give up cutting plywood myself and gave it to a special workshop, fortunately now these services have become available.
Initially, I planned to order laser cutting to get maximum accuracy, but given that in some places I needed to cut to a certain depth, I was forced to do it all with milling. The accuracy is somewhat lower, but you immediately get all the necessary indentations and don’t have to worry about it yourself later. Making a cutting layout in Corel DRAW.
and send the workshop. After some time we get a small plywood puzzle.
Re: Making your own vinyl record player
Normal - expensive stuff. What do you have that is acceptable?
Yes, there are some stones in the water, so, read, think, read some more, count and see how much money is in your pocket. It will be determined what will be the output, find the material from somewhere, a competent turner-miller, if everything is from scratch. In general, nothing special. Or you can do it this way https://forum.vegalab.ru/showthread.php?t=41339
There is a Denon dp-47f. You can listen.
The idea is to take a good phonomotor, a tonearm and make the entire chassis for it. Here are the questions: which phonomotors make sense to bother with? Well, it’s clear that the price will be appropriate)) This is probably the number one issue in importance, since the design of the chassis will largely depend on the phonomotor. The next question is: what is the chassis made of? Chipboard, MDF, artificial stone, marble. So, what tonearms should I look at? Is it possible to provide two tonearms in the design?
Source
Stage 1. Set the player level
After installing the vinyl player, you need to set the device to the optimal level. The faceplate (the disk on which the records are placed) must be positioned strictly horizontally. The main assistant in this will be a building level of the “cross” type, or an iPhone with the Compass application running, open on the Level tab. As an additional accessory, you can also find a specialized bubble level from manufacturers such as AudioTechnica, Clearaudio, Ortofon.
Adjustment can be made using the legs of the player, twisting them in height
Please note that the level of deviation from the “ideal horizon” should be measured not only on the faceplate, but also at several points on the player deck itself:
As soon as the level shows a strictly horizontal position, we move on to the next stage.
First part
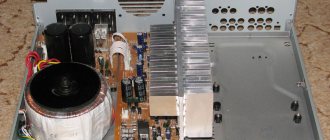
The record player was mercilessly dismantled into pieces.
All that's left
Of the entire set, only the transformer, control circuit, motor and pitch control were left, which, using a conventional strobe system, can be used to regulate the rotation speed.
The body was originally conceived as multi-layered, with layers of anti-vibration material, for which the bike was chosen, thin 3 mm strips between 3 cm layers of wood. There were 6 layers in total.
First try on layers of wood
Usually cases are glued together, but here I came across a choice: fill the anti-vibration layers with glue, thereby killing the very idea of a multi-component case, or go for a non-glued case. The second one won, as a result of which the body is tied together with 6 ties, which, together with the overlapping arrangement of the layers, makes it completely monolithic.
Fastening layers with a cut-out shaft for the engine
After processing the case with a file and a grinder, the electronics with the motor were mounted inside the case. The main problem was the complete separation of the engine and the body, if possible of course. For this purpose, legs were fashioned from Fimo plastic, which after baking become quite hard, but tend to compress like very hard rubber, thereby providing compensation for microvibrations that occur during rotation.
Next, the position of the engine was aligned relative to the housing using a digital micrometer so that the distance between the disk and the surface was minimal. At the moment it is approximately 2.5mm.
Rear control electronics housing
For the first fitting, I used what was at hand, a brass plate for attaching controls, painted black.
Control unit during fitting process
After everything was assembled, control over the rotation speed was ensured and the control unit was mounted to a first approximation, all that remained was to find a tonearm, come up with a mounting system and try the device in action.
How and why mats affect the sound of a vinyl player
It would seem that such a simple thing as a mat can significantly affect the sound and performance properties of the player. According to my observations, selecting a mat is the simplest and most effective way to adjust the sound in an already assembled tract, when there are no plans to change the components, but something needs to be adjusted a little. Why do you need a mat anyway? Sometimes it is really superfluous - many modern players are supplied without mats, they are neither included in the kit nor offered by the manufacturer as an option. Other manufacturers, on the contrary, have something in the kit and options. And there is a large selection of options from third-party companies.
Historically, the mat was invented in order to untie the needle and record from motor noise and other unnecessary artifacts, but the technical level of turntables has long ago gone beyond the limits when this is really necessary. Today, the mat is an element of convenience so that the record does not slip on the disk or an element of fine sound adjustment. A turntable disk can be light or heavy, it is made from a variety of materials, but a direct combination of a turntable disk and a record is not always the best option. For example, most acrylic discs, despite their apparent neutrality, are still better to untie, but for metal discs, with very rare exceptions, this is a mandatory rule.
01.02.03.04.0506.07.08.09.
So, it doesn’t matter whether the player comes with a mat or not, or the design of the disc is such that the mat is not removable, nothing limits us in searching for different options and combinations. The only thing to remember is that selecting a mat of a different thickness should be accompanied by adjusting the tonearm in height and fine tuning
If the tonearm does not have such settings, everything becomes more complicated. Let's say everything is regulated here. What can we choose? There are all kinds of plastics, rubber, carbon, wool, cork and mixtures based on it, leather, glass, even ceramics or copper - such mats also exist in nature. But before you plunge into all this diversity, you need to understand whether it is necessary and why.
The main things that matting can affect are transparency, airiness of the mid-upper range, balance imbalances, excessive coldness or, conversely, warmth of sound. And here you can try to derive some formulas. If the sound is too warm, muddy, or there is a blockage in the mid-upper range, hard mats, even glass or ceramics, are more suitable
If the sound is sharp and cold or there is tightness or too much bass, you probably need to pay attention to materials such as cork or felt; sometimes thin leather may be suitable
Rubber mats are more suitable for old budget devices with imperfect mechanics. Carbon or hard plastics - things are more complicated with them; there are cases and combinations when such mats work well, but more often it happens that some characteristics improve, while others worsen. Yes, and if you purchased your first player, it is not at all necessary to immediately buy some kind of mat, even if it is not included. First you need to completely set up the device, let it run in for the prescribed 40-50 hours, and only then try to determine whether additional intervention in the design is needed or not.
Structurally, solid mats are more convenient, without tricks such as a removable center. But for mats made of hard materials, it is highly desirable to have a recess for the apple of the plate. Another useful property is that simple and inexpensive plastic mats can be used instead of a dust cover, but just an unnecessary plate will do for these purposes.
Useful tips
Regardless of which version of the vinyl player will be implemented, it is worth knowing how to configure the device.
Klemp. This is a special clamp that is necessary (when the plate is bent) to straighten it. In some cases, it is even used to securely fix the plate to the disk during broadcasting. It is, perhaps, a rather controversial attribute not only of a homemade player, but also of a purchased one. The fact is that some manufacturers are categorically against the presence of these devices in vinyl players. Clamps come in different structures (screw, collet, regular), and therefore work differently depending on the player itself.
Mat. Initially, the mat was invented to untie the needle and plate from motor noise. Some manufacturers do not have such a device at all. Today, the role of swearing is to allow the sound to be adjusted. Also, with the help of a mat, the record does not slip over the disc.
Strobe. This device is necessary to check speed stabilization. It is worth remembering that the performance of stroboscopic discs depends on the frequency of lighting. The required setting is 50 Hz or more.
Test plates. These accessories are also a must-have for every vinyl record lover. But it’s worth making a reservation - they are necessary for modern devices.
These attributes look like the same standard records, with only one difference - test signals are recorded here on specialized tracks. These tracks allow you to optimize your device settings. Test plates with empty (smooth) areas are also available for sale. Despite this difference, each manufacturer provides accessories with detailed instructions.
Using test plates you can determine:
- correct channel connection;
- correct phase;
- settings of the resonant frequency of a specific path;
- anti-skating settings.
Phono stage
The audio signal that is picked up by the stylus of the pickup head is itself weak. Therefore, it needs amplification and correction, for which phono stages are used. Professionals prefer models with removable phono stages - they can be replaced with better and more advanced ones. The price of such parts is quite expensive, in addition, they take up additional space, but without them you cannot assemble a professional music system.
An example of such models isThorens TD 190-2
, a semi-professional base designed for self-assembly. The kit includes a straight tonearm with an Ortofon OMB 10 pickup, equipped with an anti-skating system. Unlike previous models, it uses full automation with electronic speed switching (33/45/78 rpm). The playback frequency range is from 10 Hz to 22 KHz with a noise ratio of 68 dB.
But the majority of players are equipped with built-in phono stages compatible with MC or MM standard pickup heads. This option is cheaper and simpler.
A typical choice of turntable for home listening is the Audio-Technica AT-LP3
with belt drive and built-in corrector. The model supports 2 speeds - 33 and 45 rpm with electronic switching, the tonearm and pickup are fully automatic and equipped with an anti-skating system, and the signal-to-noise ratio is 50 dB.
Finalization of the project
It was impossible to leave the project in this form, it was necessary to finish sawing everything back to normal, so the wood was completely sawed and processed, sanded and treated with the following composition: linseed oil, wax, rosin. All this was melted, mixed and cooled. The sanded wood was treated with the resulting composition and rubbed with a suede cloth.
The front plate was replaced with aluminum, the fastening screws were also purchased new from Ali.
The base for the tonearm is a 6mm aluminum plate, also with new springs and fasteners.
Cone legs are installed to adjust the horizontal position of the disk.
All electronics are grounded, the motor is with a screen, the output cable is a shielded cable with the ground wired into screens, the screens are stacked on top of each other from the tonearm side and cut off from the input side of the phono preamplifier. No noise or extraneous interference.
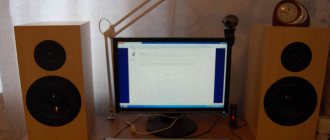
Configuration of the system in which the player plays:
- Phono stage - ViktorLab, homemade from Samara.
- Single-ended tube amplifier (China), modified, tubes from the 40s, output 300B, still made in China PSWane.
- Acoustics Klipsch Forte IV
- Nagaoka MP110 needle
We press the records and crush the resonances using a clamp
A clamp is often a very necessary, but also very controversial accessory for a turntable. If you look at history, such accessories appeared much later than the heyday of vinyl as a medium. Nowadays you can come across a variety of approaches: there are manufacturers who do not recommend using any clamps with their devices, there are also those who make their own clamps, often of a tricky collet or screw design, and these clamps are included with the turntables as a mandatory requirement. parts.
There are several theoretical justifications here, from the need to somehow straighten the record if it is slightly curved, to the complete rigid fixation of the record to the main disk during playback. But the truth, as usual, is somewhere in the middle. I discuss the issue of using clamps in almost every player test, based on the properties of specific devices. After all, everything is not so simple in practice. Different designs (simply clamps, collet or screw clamps) work differently. Clamp materials also have an impact, and weight affects not only the sound, but also the load on the bearing and motor. In terms of record alignment, almost no clamp is ideal; you need either a vacuum clamping system, as Japanese manufacturers, for example Micro Seiki, did in their time, or two clamps - in the center and along the edge, as VPI now does on older models of turntables. In the case of ordinary clamps, which can be purchased in a store, there is no definite correct solution. For some, a heavy clamp weighing a kilogram will be suitable, while in another case, a light collet clamp will be more successful. There is no single rule here, except that you should not unnecessarily load devices with light disks and not very massive bearings.
01. Heavy metal clamp Pro-Ject Record Puck - RUB 3,500.02. Clamp with carbon insert Millennium Audio Silentor RUB 10,300. 03. Aluminum collet clamps are not very heavy for their size. 04. Lightweight collet clamp, it weighs quite a bit. 05-06. Stacked Thorens Stabilizer clamps fastened with rubber rings - depending on color RUB 7,500–8,500.
Everything else - weight, design, material - works very individually. Although, having a lot of observations, I long ago came to the conclusion that if the condition of the plate allows you to do without a clamp, it is better to do so. Just press the plate down with a brush while cleaning it so it doesn’t slip. There are very few ideal clamps that do not suppress the airiness and transparency of the sound, and most often these are standard designs made by engineers for their specific models of players.
Selection of components
The first step was to confirm the type of donor. At that time, there was a Thorens 166 belt drive at home, which played very well, had a new black walnut body of our own making and had the ability to change the tonearm. Its main disadvantage was the lack of any possibility of controlling the speed of disk rotation. Primitive electronics and a motor whose speed was designed at 50Hz and directly depended on the stability of the voltage and frequency in the power supply network. In order to more accurately equalize the speed, an input AC voltage and frequency stabilizer was needed; there was no other option. In addition, phasic players sound good mainly on quiet soft music - like jazz, blues and classical. Rock played on it rather sluggishly, and despite the complete replacement of the case, it was mushy due to a bunch of resonances.
The donor's choice fell on Direct Drive (DD), which gives a more aggressive sound, and, as it later turns out, can play the same jazz and classics no less gently and accurately with the correct settings.
The tonearm was chosen by Jelco 750D as a clear representative of the optimal price-quality ratio. Higher-level ones already came with multiple prices, and in their price category, Jelco tonearms did not leave anyone indifferent.
Oak was chosen for the body as a viscous and low-resonance tree with high density, which will form the overall weight of the body without additional materials.
As a result of searching in second-hand advertisements, I purchased a Micro Seiki DD24 DD player, a gray Jelco 750D tonearm, and a set of oak boards to fit.
Internals of the MicroSeiki DD24 player
Fantastic car
Richard's home machine for making vinyl records is reminiscent of some device from retro science fiction films. It's like a car from a Rube Goldberg cartoon. It is simply impossible for an uninitiated person to understand what it is and why. The base of the device is made from a Technics LP player.
The cutting head consists of two small speakers that transmit vibrations to the diamond needle. Diamond cuts tracks on the record, and the player's needle immediately transmits the signal to the amplifier and speakers - Richard listens to the newly cut tracks, music is created right before his eyes. In a big factory, everything happens completely differently, and no one closely monitors every track.
“If someone wants 10 copies of an album, then I have to cut all 10 copies. Everything is in real time. There is no way to speed up this process,” says Hoten. Once he even had the opportunity to record the group LA Takedown, the recording went directly to the record. The musicians played for 20 minutes without a break for each copy (record) separately. The end result was several unique recordings, all of which were slightly different from each other in some way.