The peculiarities of our hearing are such that as the volume decreases, we begin to hear the edges of the sound range worse and worse, i.e. high and low frequencies. If with high frequencies everything is not so bad, then at low frequencies with a decrease in volume they require a rather significant increase. To solve this problem, a thin-compensated volume control is used.
To prove this, the following figure shows equal loudness curves for the human ear:
The above-mentioned finely compensated volume control, simultaneously with changing the volume, also changes the shape of the frequency response so that the timbre of the sound weakly depends on the volume level. In order for the loudness compensation to be correct and the volume change to be uniform, it is necessary that a certain position of the control creates an appropriate volume level at the listening point. So, when setting the volume control to the maximum volume position at the listening point, a volume level of 90 background should be obtained.
Simple, fine-tuned volume controls create a relative boost in the low frequencies, which increases as the volume decreases. There are also more complex circuits, with and without the use of active elements (transistors, op-amps), which create a relative increase in both low and high sound frequencies.
Frequency and pressure
The human ear is tuned to sounds of different frequencies that have the same sound pressure, which are perceived (subjectively, of course) by sounds of different volumes. The hearing perceives best a frequency of about three kilohertz, and this sensitivity drops if the frequencies become more than three or less than three kilohertz when the sound pressure drops. This effect can be compensated, and any connoisseur of sound reinforcement equipment knows that this is loudness compensation.
At a sound pressure level of 90-92 decibels when recording music, the desired tonal balance is set. Further, when listening in any other conditions, at lower pressure, the hearing will feel a lack of frequencies - high and low, and therefore loudness compensation will be required. Everyone knows that this is, of course, a subjective feeling, but the body still requires eliminating this deficiency. And this effect is compensated by changing the frequency characteristics, as a rule, according to curves of equal loudness (Fletcher-Manson). And this is how loudness compensation should be carried out so that it would pacify the auditory sensations, and the listening would be comfortable.
Auto calibration
I won’t describe the calibration process, other than to say that for maximum functionality, calibration should be done through the Audyssey MultEQ Editor app (yes, it’s expensive, it’s a little buggy, but without it you can’t access all the functions). The calibration process via the app is described here.
So, the calibration system will play short test signals, which are a sine wave with a rapidly increasing frequency. It will record these signals at different points located in the listening area, in the center of which the so-called. “sweet point” - the point for which the playback characteristics will be equal to the target values. Based on the results of analyzing the recordings, the system will determine the distance to each speaker, the frequency response of each speaker, taking into account the room and position of the listener. As a result, the system will adjust the overall volume level, speaker volume balance, delays, as well as the frequency response of each channel separately, bringing it to the reference level (flat, with some corrections for bass and treble).
What do we have now? Now we have an audio system that, given a known level of digital input signal, produces a known sound pressure level. Wonderful. But let's return to loudness compensation. How does it work? It implies that the reproduced material is mixed with a specific reference level of sensitivity. And if this level is really like that, then the decibels on the receiver’s volume control cease to be something abstract - they become real decibels of sound pressure - dBSPL. And at a certain position of the receiver’s volume control, the audio plays at the same volume at which it was recorded, and it is at this volume level that the loudness does not perform equalization. Further, if you lower the volume level, loudness compensation according to the curves of equal volume increases the level of HF and LF, and if you increase the volume, on the contrary, it lowers it.
What is this level at which we will get the very original volume that the sound engineer intended? Having rummaged through the settings of my receiver, I noticed that on it you can switch the volume scale from “0 - 98” to “79.5dB - 18dB”. 0 dB on the second scale corresponds to 80 on the first. This is the volume level at which loudness compensation is turned off. And if you remember the graph of equal loudness curves, you will understand that there is 80 dbSPL = 80 background, and this is the very curve relative to which loudness compensation is performed.
Execution
High-end sound reinforcement equipment has a regulator with loudness compensation, that is, it can be done quite simply. The regulator changes the volume level and simultaneously affects the amplitude and frequency characteristics of the amplifier path according to the Fletcher-Manson curves. At the user's request, you can either turn on or turn off loudness compensation, for which a special button is provided. The simplest sound amplification devices allow you to adjust loudness with an equalizer, tone control, or even manually, changing the amplitude-frequency characteristics of the sound path.
You can use a volume control with loudness compensation. Many audio lovers do just that, listening to various myths, legends and misconceptions. The main goal is to maximize high and low frequencies in order to achieve the sound you like, even if it is not at all like that on the media, even if it is a brand. These people know how to turn on loudness and why it is needed. It’s good that the equalizer can be adjusted, and you can bring the sound to a state that will bring comfort to the sound sensations.
How To Normalize Sound With Loudness Equalization?
- At first, open your desktop and go to the Start Menu
- Next, search for “Sound” and open it
Then, choose your default speaker or headphone from the displayed list
- Now go to the “Properties” button at the bottom right corner
- After that hit the “Enhancements” tab placed at the top of the same window
- Next, a few options will be on your screen
- Find “Loudness Equalization” and check the box beside
- Finally, hit the “Apply” button to save changes and click on “OK” to close
Once you complete the process, there will be a noticeable change in the dynamic range of sound. Quite sound will get amplified, and the louder sounds will get attenuated.
However, some audio configurations do not support this audio enhancement. Hence, you need to have sound cards like Realtek to normalize the volume. Know how Realtek Audio Equalizer works below.
Use Realtek Loudness Equalization for Volume Control
If you have Windows 10 loudness equalization missing, Realtek HD sound card can only help you. Though it's an obsolete product, still there are lots of systems with this sound card in motherboard.
If you own a Realtek sound card, you should install the latest drivers to keep your software flawless. In case the drivers get corrupted, you will face the fluctuations in volume. Scroll down to know more.
Loudness
This is the designation for the loudness compensation function on sound reinforcement equipment. What kind of function this is and what it is intended for, many music lovers answer in the same way: for the brightness of the sound (some even openly define this brightness as a sound similar to the letter V, that is, with inflated extreme frequencies - high and low). But this is not true at all. High sound fidelity - High Fidelity, or simply Hi-Fi - is exactly the sound that is close to the original, corresponding to one of certain standards.
There is even a special science called psychoacoustics, which studies the perception of sound by the human ear. The processes that occur in the brain when exposed to sound waves are very complex. But he doesn’t need loudness adjustment at all. Initially, human hearing was not intended to listen to music, it was necessary for survival, for communicating with others like one another, and was not at all equipped with the functions of a spectrum analyzer for measuring loudness parameters. A person perceives the mid-frequency range best, and all sensations of changes in the pitch of a sound due to its intensity (loudness) exist only in his head. And such changes are even called phantom frequencies, and they are formed only under certain conditions.
How to turn off
Examples of popular connection diagrams for a single-circuit gas boiler with an indirect heating boiler
The radio is turned off by pressing the SRC or SOURCE button (but it is worth remembering that another button, for example, FUNC, can be programmed for this function, which directly depends on the model of the radio being used).
Once the radio is fully configured, you can safely enjoy the high-quality and rich sound of the car’s audio system, which will make even long trips more comfortable and enjoyable.
Good day, readers and guests of my blog. In a recent post I described the connection and installation of the Pioneer DEH-1901UBG radio and the MYSTERY MSK 12.3 subwoofer kit based on the MK2.80 amplifier and a 12″ cabinet subwoofer with an MJB120 bass reflex. After installation, the sound was... well, nothing. It was decided to try to create all this happiness on our own. I surfed the net, watched a video on YouTube and decided to set it up. Here I want to share my experience, which does not claim to be correct or to be called an instruction, but rather to hear advice. Maybe someone will correct it, someone will advise something. I'm a complete newbie in car audio, so this is all new to me. Illustrations of the devices will be taken from the Internet, since taking out the amplifier and taking pictures of the radio screen was not fun. So, let's go... First of all, I set up the subwoofer amplifier. The connected subwoofer was a bridge. The photo showed how and where. There is a sea of information on the Internet, as I understand, the amplifier model is old, simple but reliable. There are a lot of reviews and other good stuff on the internet. The main thing is not to confuse “+” and “-“, you won’t burn it, but there will be no sound.
Then we move on to setting up the amplifier controls. We connect the tulips coming from the radio to the INPUT connectors on the amplifier. We also try to maintain the white/red polarity. Next we have three knobs and one switch. Let's start with the X-OVER Selector switch, as I understand it, this is a kind of frequency filter. Since our amplifier is used only with a subwoofer, it must be switched to the Low Pass position, that is, all high frequencies must be cut off. We don't need them. The sub should not sing, but should only reproduce the bass.—A short digression: A subwoofer is an acoustic system that reproduces low-frequency sounds, including infrasound (from approximately 5 to 200 Hz). (c) Wikipedia It hurts your eyes when you read “subbuffer”, “subbuffer”, etc. on the forums. Be literate, gentlemen.) - Which is what I did. If you are using an amplifier for the front speakers or rear pancakes, then you can, I think, set it to OFF or High Pass - to cut off the low frequencies. In my case, I repeat, the switch is set to Low Pass. Then to the right there is a Low Pass control, which makes sense just when the switch is in the appropriate position. With this we choose to what frequencies to cut the input signal. I set the control to about 80Hz. This seemed sufficient to my ears. Well, in the future I’ll go again, listen, and play. This is a preset. I set the next Bass Boost control to 0. Because it is not needed yet. We will enhance the bass using the GU settings. And finally the LEVEL regulator. It is configured next. way: set it to 0. Turn up the volume on the radio, well, in my case it was 35, and begin to gradually increase the level with the LEVEL control. Until distortion appears. Then unscrew it back a little. For me it was in a position slightly further than the middle. It may be different for you. I think there is no need to talk about the Power and Protection lamps, the first should be on, the second should not be on during normal operation of the amplifier. There is no need to do anything else on the amplifier.
Curve graph
This effect is best demonstrated by the equal volume curve graph included in the illustrations in this article, and how it works will be explained right now. The curves shown on the graph characterize how we perceive the same sound volume at different frequencies. The lower the volume (sound intensity), the more the lines “crook”.
It is to correct their curvature that loudness compensation was invented, that is, in order to adjust the volume to those values that we perceive as an even sound. If you listen to music at low volumes, unevenness becomes the most critical for perception. And if the volume of the signal becomes higher, the ear begins to perceive different frequencies linearly, and in this case any meaning of such correction is lost.
Yamaha
One of the most competent implementations is found in Yamaha amplifiers. However, the owners of this equipment not only do not always know why to turn on loudness compensation. Sometimes they don’t know how to turn it on either. A little has already been said about the purpose. Now about where the loudness compensation is located in a Yamaha amplifier. It is designed not as a separate button, but as an adjustment knob, with the rotation of which the depth of correction changes along with the volume, which is relative to the previously selected main knob. This correction corresponds exactly to the curves on the graph.
The sound becomes quieter than previously selected and “crooked” on the graph, but is perceived much more smoothly by ear. It turns out that at high volumes there is no correction, but at low volumes it is maximum. But the average consumer with untrained hearing needs something completely different. He is used to listening only to “crooked” sound, and therefore he needs a constant correction button. The saddest thing is that the customer is always right, and many manufacturers indulge their consumers. The result is deplorable - most of the equipment “in zero” does not sound.
"Natural" sound
Among professional musicians with absolute pitch, there are many opponents of such “improvement” of sound. Equipment is good only when it sounds clean “at zero”, that is, without adjustments. A question will certainly arise regarding the perception of sound by ordinary hearing, which hears it differently from what it is. Such people are the majority, and isn’t it fair to still resort to correction? Fair enough, but only if the volume is low. For large ones, no correction is needed.
People are also forced to perceive the sound of natural instruments with distortion, and the only way to compare the sound of audio systems is with them. The fidelity of the sound can only be assessed by a well-trained ear. And it is necessary to clarify that studio equipment does not have loudness compensation. This is largely a hoax. The sensitivity of hearing is different to different frequencies, and this dependence varies with changes in sound pressure.
Loudness compensation - to enable or not?
- It all depends on whether you like the sound of the speakers or not.
- If you watch movies and sometimes you hear what they say, then you don’t, then try turning it on.
- If you have high-quality acoustics and you often listen to music not very loudly, then turn it on, loudness compensation can improve the sound quality.
In general, there is no clear answer. Depends on the speakers, on the content that the speakers reproduce. You need to test it - the loudness function itself is safe.
By the way, in Media Player Classic there is a normalization option: Built-in filters > Audio switch > Normalize (checkbox), you also need to check the box for Restore. volume.
Volume control
If the volume level is low and the sound reinforcement equipment is not high-class, you can’t expect high-quality sound reproduction. High-quality amplifiers have a variety of circuits to compensate for the frequency response (amplitude-frequency response), when at low volumes the lower and upper frequencies are amplified, leveling out the sound quality. A volume control with loudness compensation is very helpful here. The circuits for implementing such a regulator are quite simple, they do not require scarce parts, and even no adjustment is needed.
Here problems of a different kind may arise. Even an ideally designed regulator with loudness compensation will provide a coincidence of compensation curves and equal sound intensity curves with a precisely defined transmission coefficient of the signal path - from its source to the final output. The volume level of timbre balancing is achieved at the same position of the control with loudness compensation for any source. The tonal balance is disrupted along with the deviation of this coefficient from the calculated one.
Loudness resistor
Most of these resistor circuits are built on the basis of variable resistances (the resistance is the resistor), for which additional taps were provided. Their disadvantage is that only special variable resistors with shallow compensation are used.
They also have a certain nonlinearity and step-by-step behavior when reproducing high and even more low frequencies. However, these circuits are used quite often both in the manufacture of new equipment and for modifying finished amplifiers, receivers and radio tape recorders.
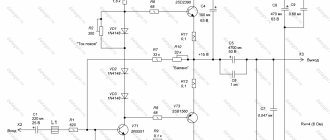
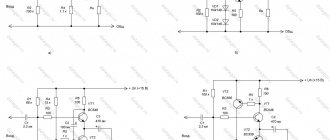
Basic connection diagrams
Scheme No. 1:
Capacitor with a rating of 100-500 pF - compensators of such ratings are most often found on guitars from Ibanez, PRS and on some Telecaster models.
The optimal operating range is from 40% to 100% volume. Less than 40% - the sound takes on a rather ringing character, which worsens the mix. However, such ringing and brightness of sound can become a definite feature.
Scheme No. 2:
You can eliminate ringing by adding resistors to the circuit, as shown in the figure above (2 and 3 circuits), but in this case it is necessary to use other capacitors and resistors of certain parameters.
The second circuit uses a capacitor with a nominal value of 560-100 pF and a resistor with a nominal value of 80-500K, a parallel connection. A similar design is used by manufacturers such as Seymour Duncan and DiMarzio.
Also in this circuit it should be provided that the resistance of the resistor is in the range from 50 to 90% of the resistance of the potentiometer, however, the capacitor in this circuit affects the dependence of the resistance on the angle of rotation of the potentiometer knob.
For confident work
If the device uses a regular volume control, that is, a regular variable resistor, you need to work with loudness separately. A special circuit is switched on instead if this resistance was not included in the circuit of amplifying feedback nodes.
However, in this case, the output resistance before the volume control in the previous stage must be taken into account; it must be much less than the resistance of the resistor. The input resistance of the next stage is also taken into account, which must be greater than the resistance of the resistor. And the greater the difference in resistance, the better the coordination of the loads, which is why, in general, the equipment operates more reliably.
For guitarists
Many guitarists notice a proportional loss of high frequencies in the sound when turning down the volume of their instrument. This effect is especially noticeable when the guitar has single-coils. Actually, as experts say, this is not a problem at all. This simply creates a less congested and darker sound, quite suitable for a rhythm part. For solos, the volume increases, the sound cuts through the mix better and generally becomes brighter. You just have to listen to your instrument and leave the circuit as is, without any changes.
There can be many reasons for the loss of high frequencies. Cables and all electronics work together as a filter, as a loudness compensation resistor. This is especially visible at low frequencies, since the low-pass filter only works up to a threshold, after crossing which it cuts off all frequencies altogether. Therefore, maximum volume moves the blocked frequencies beyond the audible range, and if you turn the potentiometer (that is, lower the volume), the resistance of the circuit increases, shifting the cutoff frequency of the low-pass filter into the range that we hear.
Troubleshooting
Cables should be high quality, low capacitance cables that have much less impact on high frequency dropout. Of course, there are some inconveniences here. Firstly, such a cable is expensive, and secondly, it is rigid and heavy. A long cable has more capacity than a short one. The inconvenience here is that movement around the stage will be limited.
You can compensate for losses in high frequencies if you solder a capacitor to the ungrounded legs of the resistor at the input and output, then the circuit will have a filter that adds more high frequencies to the output signal. The capacitance of the capacitor sets the frequency that allows the signal to pass above the threshold. And the larger the capacitance, the lower the frequency threshold.
Loudness compensation in a computer
For personal computers, mobile devices, media players and other similar equipment, and equally under Linux or Windows, volume controls work linearly. You can turn the slider almost to the very bottom and not change the volume, but then each pixel noticeably changes it. But this should be regulated in decibels. There is practically no real loudness anywhere. Everything is done only by adjusting the sound. The frequency response is always adjusted depending on the sound card.
The API provides an interaction interface, but specific functions may not be available. Somewhere there is a good graphic equalizer, somewhere there are at least sliders to tighten up the timbres of low and high frequencies, but somewhere there is nothing available at all. And even where there is, you cannot receive or give specific advice: each operating system dictates its own. For the “seven” it’s like this, for the “ten” it’s like that, but Linux is generally a special matter.
Instructions for increasing bass in headphones and speakers in Windows 10
- To open the menu section where audio substring is performed, hover the cursor over the sound icon, which is located on the right side of the taskbar and right-click.
A menu will be displayed, there you should click on the Playback devices item.
The playback devices will be listed in the open window. There may be headphones, speakers, ports for outputting a digital audio stream. You need to select by clicking the mouse the device for which you need to enhance the bass. Next, click the Properties button, which is located at the bottom of this window.
In the example, we will perform this procedure for the speaker playback device. The device properties window will open. In it, click on the Enhancements tab.
This tab displays the improvements that are available for the audio card that is installed in your computer or laptop.
Among other things, this window should have a Bass Boost item - check the box next to it and click the Settings button located below...
In the window that opens, set the level in decibels at which you want to enhance the bass in the system.
Having done all this, press the OK key.
All. Bass in Windows 10 is now boosted.
You will more clearly hear low frequencies not only in musical compositions, but also in the audio components of films and games.
In turn, you can also help us a lot.
By sharing the results of the author’s work, you will provide invaluable assistance to both him and the site as a whole. Thank you!
If you bought a brand new speaker system for your computer or a set of expensive headphones, but the bass isn't working as well as you hoped, then the problem is not with your headphones, the problem is with your Windows settings. You can easily change the audio driver settings in Windows 10 to boost bass frequencies to enjoy booming sound coming from your headphones or PC speakers. This setting exists in the drivers that Microsoft ships with Windows 10, Windows 8.1, and Windows 7 systems.
Here's how to boost bass on Windows computers:
1. Right-click on the speaker icon in the system tray and select “Playback Devices” from the menu.
2. Select “Speakers” (or any other output device for which you want to change settings) from the list, and then click on the “Properties” button.
3. In the “Enhancements” tab, check the “Bass Boost” item and click “OK”.
4. By default, the Bass settings work very well, but you can click the “Settings” button to change the frequency and gain level of the Bass effect.
Share “How to increase bass for speakers or headphones in Windows 10”