Wilma-102-stereo
Vilma-102-stereo Another crowning achievement from the Vilnius Instrument-Making Plant.
They started producing it in 1981. What is noteworthy is that “Wilma” was equipped with a dual-motor tape drive mechanism with a closed path and quasi-sensory control. The deck was equipped with a Dolby-B type noise suppressor, auto-stop, signal level indicator and tape consumption counter. The entire electronic part of the tape recorder was made on integrated circuits. The signal was read by a combined magnetic recording and playback head.
It was also possible to calibrate the recording current for a specific type of tape and adjust the bias current. This device weighed an unbearable 13 kg!
Olympus
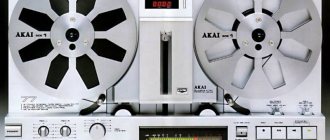
Perhaps the most serious of the listed equipment were reel-to-reel players of the Olympus brand. The most compelling argument is that it was on these machines that Soviet stars, who could not afford special studios, often recorded their hits.
"Olympas" were produced at the Kirov Electrical Mechanical Engineering Production Association named after. Lepse. The plant is still alive today. Moreover, it was possible to expand the scope of its production to medical, automobile, railway and oil refining products.
Yes, only memories remain of the former glory of the famous Soviet tape recorders. Unfortunately, the greatness of many of the factories that produced them has sunk into oblivion, and today only a few of them have been able to retain their name and some part of their production potential.
Deep upgrade of Vega-106
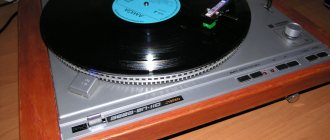
Today, from a like-minded friend, I brought home a vinyl turntable Vega-106. I still don’t understand what could be done with a turntable “found in a trash heap” so that it would completely outplay everything: Lenks, Thorens, Garards, Duals, Browns – combined.
Masala-chai = But it seems to me that 90 percent of the play on a vinyl turntable is: cartridge, stylus, tonearm and table, and only 10% is left with a corrector according to the SRPP scheme or simply with an anode resistor in the classic form. But my friends have the exact opposite opinion: the phono stage is important first of all.
In order to bring the sound of a vinyl turntable to a filigree level, the following components are required: the gift of a designer-developer, an understanding of the physics of the process, and, of course, a keen ear for music. Those qualities that a wonderful person possesses - Alexey Baltinsky, my fellow countryman and like-minded person. Now in his apartment there are about 15 vinyl turntables brought to him for an upgrade.
In terms of sound quality, the Vega-106 vinyl turntable outperformed everything I had heard in my life. What’s interesting is that with most other vinyl turntables, the sound quality on the last tracks deteriorates as the tonearm approaches the record’s back, in particular, intelligibility decreases (a well-known phenomenon associated with a decrease in the linear speed of mechanical recording). And on this vinyl turntable, everything plays smoothly, without loss of intelligibility. Perhaps the quality does not change towards the end of the record due to the dynamic clamp developed and installed by my friend Alexey.
Sova = Still, the sound quality of a vinyl turntable is determined by the design and materials of the original device. An example is that a relatively modern vinyl turntable with a belt drive, which was repeatedly remade and cost $2,000 in a store, immediately and irrevocably lost out to an old vinyl turntable (worm) for more than 10 times less price. Only the tables were compared - the head, tonearm and corrector were the same.
Masala-chai = It’s hard to even imagine what titanic efforts are needed to make a belt, especially one as primitive in design as that of Vega-106, play. I don’t mean the “sophistication”, which most often does harm, but the typical belt design from the “plasticine rubber band and on a plate” series. But maybe they did everything radically differently here, what’s worth discussing. The intelligibility of a vinyl turntable is most often determined by the tonearm and head. It's good that this worked out. And how to get: “power”, composure, dynamics, thunder, grit, with rubber and plastic – it’s impossible to imagine. The first track and the nickel turntables play differently due to the change in linear speed, and no amount of clamping can level this out. With high-quality tuning, you can avoid clearly audible distortion, up to 15-20 percent even on uncut records.
Complete rework
About Vega-106 in detail. Half of the parts for its upgrade came from Germany, and he made the second half himself, incl. wooden plinth and cover. The vinyl turntable is equipped with a Pickering 625 E head. The uniqueness of this Vega-106 is the amazing intelligibility and identity of the sound of the first and last tracks on the record (on any record!). I have never seen this on any vinyl turntable. I’ll try to ask my friend how he achieved this.
I don’t want to listen to the old Browns and Duals that have lived in my house for decades; now I only listen to this “miracle from the trash heap.” Although the heads on them cost what they need: Empire-2000, I don’t remember exactly, about 5 years ago I paid for them on eBay for 600 dollars apiece, and the tonearms there are good, it was all done 40-50 years ago, now they don't do that.
When he handed me this vinyl turntable, he showed me a whole album of drawings, according to which the parts were turned at the precision mechanics factory. The entire filling of Vega-106 was completely replaced, rollers, bearings, belts came from Germany, setup and adjustment were carried out in the laboratory. I have Dual-741, 1980. with a central drive engine - the top model in Europe in the same year 80. Heavy metal plays amazing. Brown, born in the 60s, is a spinner for intellectuals. They both have Empire-2000 heads, because... I consider her the best in the world, sometimes I switch her to Shur No. 4, but all this doesn’t hold a candle to Vega from the trash heap.
Serenus = In my experience, it is the “structurally complex” vinyl turntables that play the worst. Although this Vega-106 is hard to believe, I suspect that this is more a question of the psyche and those vinyl turntables with which this miracle of Polish/Sverdlovsk friendship was compared. From the photographs it is not at all clear what the charm of this Vega is, and the German parts are also not noticeable. If everything was radically redone, it was easier to do everything from scratch. A couple of years ago I was given a similar vinyl turntable as part of the Vega music center. At first glance, there is a lot of plastic in it, and the design is very poorly made. I haven’t thrown it out yet because of the German amplifier, I want to check how the sound is for fun. You can still agree about Brown, but regarding the roller Duals - it’s obvious self-hypnosis. By the way, some kind of Vega was also a roller skate. All the rest, including Arcturus, raise strong doubts. I don’t know how she plays heavy metal, but God forbid everything else. As for Brown, I can’t evaluate, I’m not an intellectual. “The best head in the world” Empire, the statement is entirely up to you.
Masala-chai = This is not Vega-16 anymore and not from the trash heap. This is already the author's design. Roller Duals played very well. I once had a Vega-106 vinyl turntable, it had a roller/pass drive, but the engine was weak. The panel itself was made by the Polish Unitra under license, it seems Philips. Roller Dual will be stronger (all other things being equal).
This is a true remark, but the Poles failed to breathe life into this Unitra; for this they needed a talented designer who threw away all the crap and delivered what was needed, and he worked on this masterpiece for 4 years.
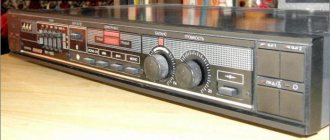
Argo RM-006S
0 A model similar to imported ghettoblasters has been produced since 1988 by Leningradsky. Its receiver operated in the DV, SV, HF and VHF-FM bands, in which stereo programs were received. The cassette recorder could record and playback soundtracks from built-in microphones, a radio receiver and external signal sources. Among the functions, noteworthy are a five-band equalizer, a noise reduction system, automatic switching of magnetic tape types, and an electronic clock with a timer. The maximum output power when operating from the network was 5 watts per channel. The dimensions of the radio were 519 x 327 x 170 mm, weight - 7.7 kilograms. This beauty cost 608 rubles.
Argo-004-stereo
0 This top-class radio and its twin sister with the index 002 have been produced by Leningradsky since 1984. The built-in cassette deck had a switchable ARUZ system, a noise reduction device, recording level controls, a tape counter, and auto-stop. The receiver worked in all broadcast bands, the built-in speakers had a two-way configuration. To adjust the sound to your taste, there were timbre blocks for low and high frequencies, as well as a stereo expansion circuit. Power was supplied from the mains or six A-373 batteries or an external source. The rated output power of the model was 2 x 1.5 Watts, that is, the maximum was twice as high. The radio tape recorder weighed 8.5 kilograms and cost 595 rubles.
Finalization
“Vega 50U-122S” is not a particularly high-quality amplifier. Especially those models that were produced after the collapse of the Union. The soldering was of disgusting quality. The wires fell off on their own. Exactly the same as other components. Therefore, after purchase, I had to resolder everything manually. But the full potential of Vega is revealed only after proper modification. What is the essence of the improvement? Vega is equipped with standard UM type capacitors for such devices. These are not particularly high-quality components, so you can’t expect high-quality sound. It is better to replace them with something comparable from TDA or STK. It seems like a small thing, but the sound will improve. To do this, you need to remove the old capacitors from the printed circuit board and install new ones in their place, which can easily be purchased at any radio store.
But that's not all. It would also be advisable to replace the VT49 transistors with more adequate components (VT43 would be perfect). You can also correct the manufacturer's flaws (poor soldering, wires). All this can be replaced, which means the amplifier will sound much better. This is the “station wagon” that the Vega 50U-122S turned out to be. Refinement will help the amplifier work long and efficiently. That is, exactly as he was originally supposed to. But let's move on to the next section of the material.
history of the company
is a well-known and large manufacturer of equipment created in the Soviet Union. Geographically, it is located in the Novosibirsk region. The production arose in connection with the transformation of the Berdsk Radio Plant (or BRZ) in the mid-1980s.
This enterprise produced a large number of equipment, including:
- transceiver radio stations;
- ship and coastal radio stations;
- Power supplies;
- wired telephone sets;
- Acustic systems;
- radios and radios;
- tuners;
- radios;
- tape recorders of various types (set-top boxes, cassette recorders, mini-cassette recorders);
- cassette players;
- voice recorders;
- radio complexes;
- vinyl players;
- amplifiers;
- CD players;
- stereo complexes.
Thus, you can make sure that the manufacturer's range is quite wide.
It should be noted that throughout its existence the company was transformed several times. As for the modern period of its existence, since 2002 it has been operating in the form of an open joint-stock company and is engaged in the repair and production of home radio equipment of its own design on individual orders.
Positive feedback from owners
So, what do people say about a product like the Vega 50U-122S amplifier? Some reviews are simply odes of praise to the amplifier. It seems that these people agree to idolize all Soviet technology. No matter what quality it is. Nevertheless, the owners note the high sound quality for an amplifier of this level (naturally, in tandem with a good speaker system). Many people are happy about the thin body (which is indeed unusual for Soviet equipment). But most are happy with the price (on the secondary market) and ease of modification and repair. These are the features against which it is impossible to come up with any counterarguments.
Sputnik goes into orbit
Despite the fact that cassette recorders were not popular at the beginning of their development due to their high price, Proton engineers believed that their product had significant potential, and that this model needed to be modernized further. They spent several years improving Desna, until 1982. As a result, by 1971 the Sputnik-401 tape recorder appeared, which was created on the basis of the mechanics and electronic filling of the Desna. Soon, along with Proton, the Arzamas instrument-making plant began producing this model. The new version of the tape recorder was called “Legend-401”. Improved tape recorders differed from their predecessors primarily in sound quality. And for the better. The designers carried out thorough work on reducing detonation, debugging the noise-signal ratio, improving amplifiers and modernizing Sputnik-401 circuits. There were even a number of high-quality innovations: the device was able to play cassettes at second speed (2.38 cm/s), and also perform the functions of a long-wave radio receiver. To do this, it was necessary to use so-called radio cassettes, which can be called a kind of prototype of MP3 cassettes.
Amplifier repair
The Vega 50U-122S amplifier is a fairly reliable device. But it also tends to fail. But repairing the Vega 50U-122S amplifier does not pose any problem for those who have at least a little knowledge of radio technology. What most often fails in this device? Usually these are diodes in the KD202D and KD202K bridges. Due to the voltage drop, they burn out and the amplifier simply refuses to turn on in the future. Replacing them is not difficult. They are available in any radio store. You must first “ring” the diodes with a tester to make sure that the problem is in them, then unsolder the damaged components and solder others in their place.
However, this is the simplest fault. But what to do if the amplifier turns on, but there is no sound? There may be several problems here. However, the most common is the failure of a capacitor. To confirm this hypothesis, you should ring all capacitors with a tester, identify the faulty one and replace it. But remember: never do anything with the amplifier boards without a schematic. Out of ignorance, you can do such a thing that the equipment will be on its way to the trash heap. By the way, the diagram of this device is posted in the article.
Instructions
The operating instructions are a document that is attached to each device manufactured. It contains all the necessary information about the design of tape recorders, as well as operating diagrams.
The instructions contain the following sections:
- general instructions;
- contents of delivery;
- main technical characteristics;
- safety instructions;
- brief description of the product;
- preparation for work and procedure for working with a tape recorder;
- tape recorder maintenance;
- warranty obligations;
- information for the buyer.
The instruction manual is a document that gives you a complete understanding of the principles of operation of the tape recorder you purchased, and also provides such important information as the manufacturer’s warranty.
The following is an overview of the Vega RM-250-S2 tape recorder.
Modernization of PKD Vega-122S
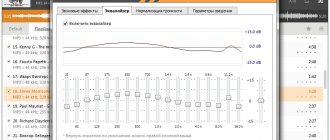
EXPLANATIONS FOR VEGA'S TWEEK. All capacitors in the low-pass filter are type PM1 or PM2, all resistors are C2-29 or BC. The output electrolyte is bypassed by K71-7. Instead of BC413S, you can try BC550 - the main thing here is not to run into the wrong product, because... The nature of the sound greatly depends on the transistors. So, when using KT3102, Vysotsky becomes like the last criminal, and P307V sings too softly. In any case, it is advisable to have the first transistor with a coefficient. current transmission > 250, because The LC7881 DAC requires Rin>1MOhm. The transformer in the power supply is a torus, but you can use any suitable one. My power supply is mounted outside the VEGA behind the standard power supply. LPF BOARD: The first transistor is a buffer and provides the high input impedance required for normal operation of the LC7881 DAC. The second transistor has a third-order Bessel low-pass filter with a cutoff frequency of 20 kHz at a level of -3 dB. That's all the analog part. Bessel - because it processes pulse signals better than anyone else. In addition to PM1 and PM2 capacitors, you can try mica and fluoroplastic ones, but I haven’t tried them myself. Domestic polypropylene ones are definitely worse. Ceramics are not allowed. It is better to install a proprietary sound electrolyte for the output electrolyte. I didn’t have one, so there is an unknown foreigner from the mixing console, bypassed by K71-7 (not indicated on the printed circuit board, soldered with a canopy on the side of the conductors). Structurally, the low-pass filter board is installed vertically, between the DAC and the output sockets, on the side of the VEGA motherboard, and is attached to it with corners. At the bottom of the low-pass filter board there are 3 electrolytes, which are shown in the diagram together with the DAC. (That's where I wanted to install them, but there wasn't enough space). STABILIZER BOARD: All stabilizers are included according to the standard circuit. Half-wave rectification was used solely due to the limited number of secondary windings of the transformer I have. Resistors connected in series with the windings reduce impulse noise from rectifiers. The load resistors of the stabilizers provide them with an operating mode with a constant output current, practically independent of the signal. Powering different consumers from separate windings reduces mutual interference and simplifies ground wiring. The stabilizer board together with the transformer is placed outside the VEGA behind the standard power supply and is covered with a PCB box. ADJUSTMENT (or rather a check, since there is nothing to adjust): First, we measure all the voltages of the stabilizers - deviations are no more than 5%. Using an oscilloscope we monitor the absence of excitation. If everything is OK, we connect the low-pass filter, having previously done the following: We solder a 15 kOhm canopy between the low-pass filter input and +15V, then 3 kOhm between the input and ground, thus simulating a constant output bias of the DAC equal to 2.5V. Next, through a capacitor > 10 μF we apply a sinusoidal signal with an amplitude of ~2.5 V to the input from the generator and measure the frequency response. At 20 kHz the amplitude of the output signal should be ~0.7 of the amplitude at 1 kHz. When a square wave signal is applied to the input, the overshoot should not exceed 1%. We remove the canopies and install everything in VEGA. CONNECTION: First we prepare the motherboard. We unsolder the diode connected to the 2,4, and 10th legs of the DAC, thus turning off the standard power supply. Using a cutter, carefully cut the jumpers between the above legs. We solder the resistors connected to the 1st and 20th legs of the DAC. If you are going to use the original output sockets, then all their contacts, including the ground one, must be freed from the old connections using a cutter. If you decide to install new sockets, do not forget to isolate them from the housing. We solder everything according to the schematic diagram. RESULTS: Absence of characteristic dirt and slurredness on the tops. Subjective expansion of the frequency range Excellent voice transmission A sharp decrease in intermodulation PAYMENT FOR RESULTS: Small clicks when turned on Lack of deemphasis Slightly lower 1.7V instead of 2V maximum output signal level.
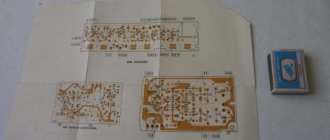
06.24.05 New! I posted a set of documentation for building an external DAC from SASHA KARAKULOV
Schematic diagram of Vega-121 External DAC by Sasha Karakulov Printed circuit boards in PCAD4.5 format
Electronic spring
The Vesna-305 and Vesna-306 cassette recorder models were popular, and in particular because of this, they were produced until 1978 without any design changes. In total, about eight hundred and fifty thousand of these tape recorders were produced. Based on the first cassette players of the “Spring” series, “Spring-202” and “Spring-205” were created, which already had a number of innovations and modernizations. The factories that were initially involved in the production of the “Spring” line subsequently continued their production. At the end of the 1970s, stereo tape recorders “Spring-201 stereo” appeared, and a year after that, “Spring-211 stereo”, which had a more powerful amplifier and a stereo pair. The seventies became a time of development and progress for Soviet tape recorder engineers. "Vesna" made a new round of development in 1985, when tape recorders with a fundamentally new layout scheme - "Vesna-310S" - were released. Subsequently, the Ryazan instrument tape recorders began producing devices identical in design under the name “Rus”; the model “Electronics-301”, also known as “Parus-301”, takes its rightful place. Its development and production was carried out by the Moscow TochMash. Serial production of this line started in 1972, and it soon gained the same fame among Soviet people as the Vesna cassette players. Some mechanical elements were copied from the Grundig C100L tape recorder. The device was equipped with a wear-resistant Soviet-designed tape drive mechanism and supplemented with an electronic speed stabilizer. Two years after the appearance of Elektronika-301, they released the 302 version, which was very similar in appearance to its predecessor. She received a 1GD-40 loudspeaker, thanks to which it was possible to improve the fidelity of reproduction. At different points in its history, Parus tape recorders were produced using imported components, in particular Japanese-made JVC heads and SONY engines. The beginning of the development of tape recording in the USSR was a time when engineers resorted to both complete borrowing and the development of entirely original, brilliant solutions. Moreover, despite the inexperience of Soviet engineers in this area, domestic developments met the needs of the user better than Western ones. Soviet specialists often managed to realize the modernization potential of devices that were considered obsolete in other countries.
Tags: USSR, electronics, mechanism, Historical truth, tape recorder, engine, cassette
- Back
- Forward
↑ Reviving the EPU
↑ Engine
Remove the support disk, belt, impeller and press “start”.
Is the engine making a loud noise? No luck, his place is in the trash, we are looking for a donor for transplantation. Just growls? Great, the patient will live. We unsolder the wires going to the engine from the contact strip. I apologize, I didn’t take a photo of this process, I got too carried away. We make a mark on the body and the lid (they will need to be aligned), and carefully pry the lid off with a scalpel or flat screwdriver. It is important to be careful as the screwdriver can come off and cause injury. There are brass brushes on the engine cover that need to be bent a little to the side (1 mm is more than enough) so that they slide along the current collector contacts in a different place.
There may be burrs between the contacts themselves that need to be removed with a gypsy needle. The bearings need to be generously lubricated with silicone grease, or with a spindle. Now you can put it back together; the cover can be pressed in using carpentry clamps. We put the engine in place. Turn it on.
If it growls, then you can drop silicone oil into the gap between the shaft and the housing. A couple of drops of it are needed to lubricate the spindle shaft. The spindle itself must be cleaned of old grease using alcohol and a cloth.
↑ Passik
Next, remove the belt and measure its length when folded. I had 235 mm, which means its place is in the trash. The length of the new one is 220 mm.
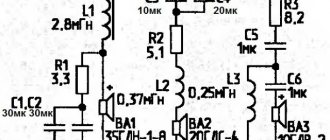
↑ Photoresistor
Checking the photoresistor. The resistance of the illuminated one should be about 2 kilo-ohms. More? We put a new one in the bucket. I installed FPF-7A.
The remaining improvements to the EPU control system are shown in the diagram: instead of a half-wave rectifier there is a diode bridge (any 400V, 1A), C9 is shunted with a “film” of 0.22 microns, instead of R15 there is now a 7810 stabilizer, screwed to the chassis through a mica spacer in place of the D5 zener diode. It is better to replace the RF diodes with 1N4148 (KD522) (D2, D3, D6, D9). Light bulb Z2 changes to a red LED with a current-limiting resistor. (see diagram) T4 is now placed on a small radiator, and C1 has been replaced with a film one for a voltage of 400 V (they didn’t find 10 kV in the store, hee hee).
The EPU was collected and checked after each stage of refinement, and after the performed procedures for prevention and modification of nutrition, the speed no longer floats; Moreover, now I don’t need to set it again on my Vega every time I turn it on. List of parts:
Diode bridge 400V 1A - 1 piece, Capacitor 0.22mFx63V - 1 piece, Capacitor 2.2mfx63V - 1 piece, Stabilizer 7810 - 1 piece, Diodes 1N4148 (KD522) - 4 pieces.
↑ Strobe
Another trouble with the EPU is the dim strobe lamp, which makes it difficult to adjust the speed by marks in bright light or during the day. To do this, I removed the cover of the sroboscope, shook out its original intestines, and soldered a diode bridge with a canopy, to the output of which a blue LED was connected. The bridge is connected to the secondary, which powers the EPU through a 3.3k, 1W resistor.
Parts list:
R1 - 3.3k, 1W - 1pc, VDS1 - 1N4007 - 4pcs HL1 - 5mm super bright LED in any color of your choice.
The containers are of high quality; according to repairmen, they have never been found to be dry, which means there is no point in changing them. Although I changed some of mine. Variable P5 may need to be replaced with a new one, trimming resistors P1, P2 could have oxidized, so we check them and, if necessary, change them. Mine were fine. Assemble the turntable, click “Start”. The speed may fluctuate for 10 seconds - the instructions generally indicate the need for a 5-minute warm-up - then it returns to normal. Maniacs can install a heavy support disk from Unitra G-602 (Vega 106, 108), but I did not notice any significant changes in the operation of the ECU.
↑ Tonearm
I replaced the wiring in the tonearm with a regular Soviet installation wire with a cross section of 0.07 mm square.
in fluoroplastic insulation. To do this, I had to remove the tonearm tube (but the bearings can be lubricated). The hardest part is getting the end of the wire out of the small hole at the end of the tube. For convenience, I used a bent pin. The wires are soldered to the pad as before. The shielded cables running from it to the ECU board in the trash bin only pulled the “ground”. A shielded cable is soldered to the block and goes directly to the corrector. Thus, mute keys that spoiled the sound were removed from the path. The “color markings” of the wires were made using scraps of insulation from different colored wires. It's all here. Let's move on.
Model overview
The range of tape recorders from includes a large number of models. Some of the most popular models are MP-122S and MP-120S. Let's consider the characteristics of well-known models of tape recorders from.
"Vega-101 stereo". This device is the very first electrophone of the Soviet Union. It belongs to the first class and is designed for playing stereo records.
The devices produced met the needs of Soviet consumers. Every resident of our state, as well as neighboring countries, could purchase a unit that would meet his desires and requirements.